JAMF is an IT Management tool for Apple devices and has replaced Centrify for AD authentication, binding, and configuration of MacOS hardware in the USGS. As a part of the Centrify to JAMF migration, the baseline supported Operating System for MacOS will be moving from Mojave to Catalina. The JAMF service is managed by the Enterprise Services team. The BUTST is responsible for STIG development and managing the baseline application list. If assistance is needed (unless specified otherwise below) – open a ticket with the BUTST, who will elevate to the JAMF team if JAMF admin access is needed to resolve onboarding or JAMF management issues.
Do Not try to enroll a system that isn’t on the Local Network. That means in your office and hard-wired with ethernet. VPN will not work. IGSWLAN will not work. You must also be physically with the system in order for enrollment to be successful.
Do Not Re-Enroll a JAMF-Managed Computer Without First Contacting the ES JAMF Team. The JAMF team will confirm if a re-enrollment is recommended and will clean up any old objects in JAMF prior to re-enrollment.
Prerequisites
During the migration from Centrify to JAMF, all Mac computers are required to have a Clean Installation of the Mac OS X 10.15 (Catalina) Operating System. Computers running Mac OS X 10.14 (Mojave) cannot be managed by JAMF and will require a clean installation of Mac OS X 10.15 Catalina OS before proceeding. New Mac hardware that has not been configured does not need to have the OS reinstalled.
In order to avoid putting unsupported apps or configurations back onto a newly-imaged Mac, it is not recommended to use Time Machine as a data transferal tool between a non-JAMF-managed Mac and a JAMF-managed Mac. An alternative local tool for backup and restore of Mac User data is highly recommended.
Enable AltSecurityIdentity for Active Directory user accounts that will logon to the Mac with Smartcard Authentication. Note: AltSecurityIdentity configuration may cause logon failures on Macs that are bound to Centrify.
Procedures to manage AltSecurityIdentity are as follows:
- Local COUA configures AD User accounts for users who will log on to JAMF-managed Macs to be members of the AD Group “IGSL USGS JAMF Enable”, which is located in the gs\DI\EAD\Group\JAMF OU
- A script runs every 30 minutes, at 15 and 45 minutes past the hour, which updates the AltSecurityIdentity for users in the “IGSL USGS JAMF Enable” group.
- The script will remove AltSecurityIdentity for user accounts that are removed from the “IGSL USGS JAMF Enable” group.
- For users who need temporary access to logon to a Centrify-bound Mac, the Centrify Mac computer object and the user’s AD object can be made members of the group: “IGSU DI-TFA-ComputerExceptionTMP”. The temporary access expires after 7 days.
DNS must be properly configured: – https://tst.usgs.gov/security/best-practices/dns-dhcp-best-practices/ Improper DNS configuration can lead to improperly named computer objects.
Know Your AA System Boundary Information: The enrollment process includes steps for auto-configuration of the System and Subsytem BigFix keyfiles. If the AA Boundary information is unknown, please see the USGS BigFix A&A Boundary Properties spreadsheet and collaborate with local BigFix operators and webreports viewers to confirm the keyfile values that should be used.
Perform a Clean Installation of Mac OS X 10.15 (Catalina)
This section can be skipped for new, unconfigured Mac hardware running Catalina. For hardware migrating from Centrify to JAMF, it is assumed that user data has been backed up using local tools, if applicable. Follow the below steps to create a bootable media and perform a clean install of Mac OS. BUTST does not support the downgrade of the unauthorized Mac OS 11 (Big Sur) to Catalina.
Create a Mac Bootable Flash Drive
Follow the steps on Apple’s How to create a bootable installer for macOS – Apple Support webpage to download the macOS Catalina app and create bootable media. You must use the Safari browser.
Boot a Mac from a Bootable Drive (Intel processor)
- Connect the boot media device to the Mac
- Press and hold down the Option Key during boot, until a screen showing bootable volumes is displayed
- Select the volume containing the bootable installer and press Return.
- If prompted, enter the local admin account credentials to unlock the disk and open the macOS Utilities page
Option 1: For computers previously managed by Centrify and for computers that are attempting to downgrade from an accidental BigSur installation, a clean wipe of the drive using Terminal is highly recommended:
- From the Utilities menu, select Terminal
- Type: diskutil list in the terminal window and press the Return key.
- Scan the output and find the apfs container, and note the IDENTIFIER
- In the below example, IDENTIFIER is “/dev/disk1s2”
- Type: diskutil apfs deleteContainer /dev/disk1s2 and press the Return key
- After the operation completes, quit Terminal
- In macOS Utilities, double click on Disk Utility and change the name of the drive from Untitled to Macintosh HD
- Select Erase and Format APFS. Click Done when formatting is complete.
Option 2: For computers that do not require a clean wipe, use the following steps to erase and format the internal drive:
- In macOS Utilities, double click on Disk Utility
- Select the internal drive (typically named Macintosh HD) and click the Erase button using the following options:
- Name: Macintosh HD
- Format: APFS
- When erasing is complete, close Disk Utility.
When the disk is prepped following either Option 1 or Option 2 above, click Install macOS in the Utilities page and follow the on-screen prompts to finish installation of the macOS Catalina OS.
Catalina Setup
Overview
At first startup of macOS, the Setup Assistant will display and walk through several configuration options. It is important that the following options are selected, when prompted:
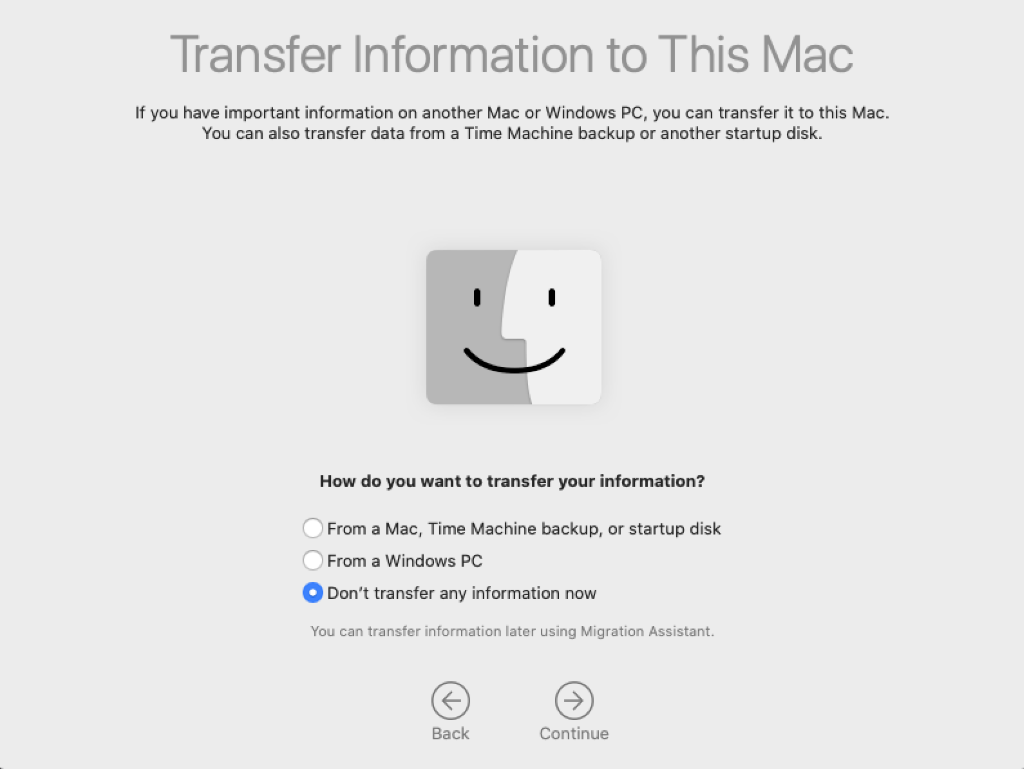
- Transfer Information To This Mac: Don’t transfer any information now
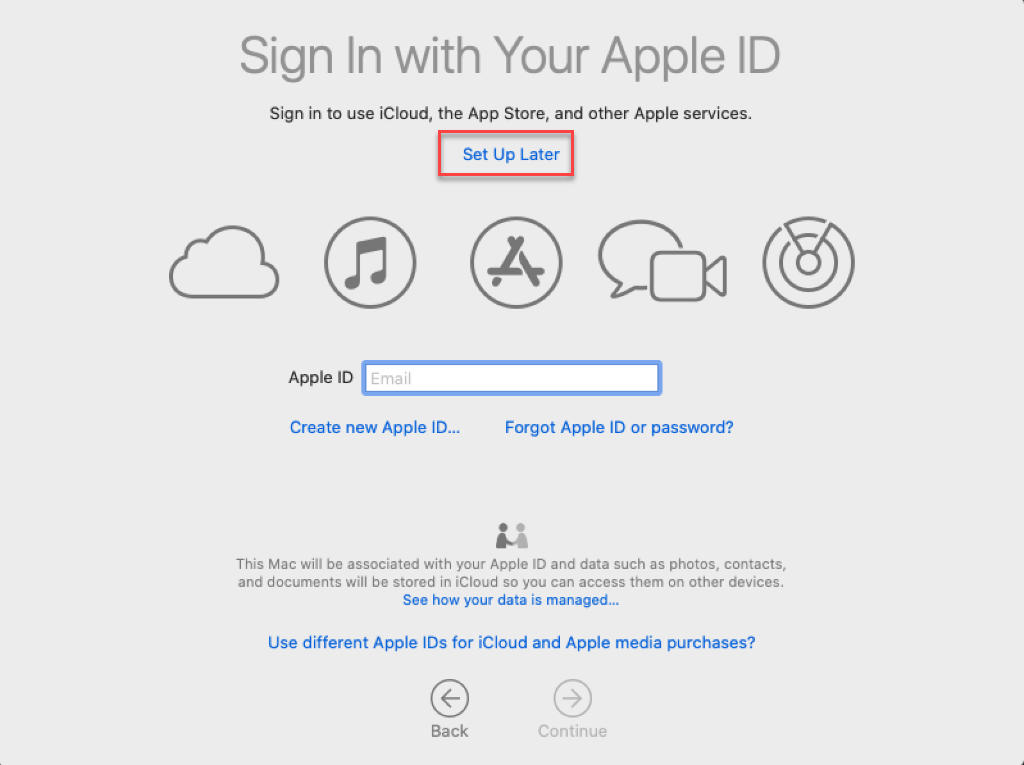
- AppleID: Set Up Later
- Create Computer Account If a name other than usgs_laps is entered, JAMF enrollment scripts will fail. This account must be configured with a local password.
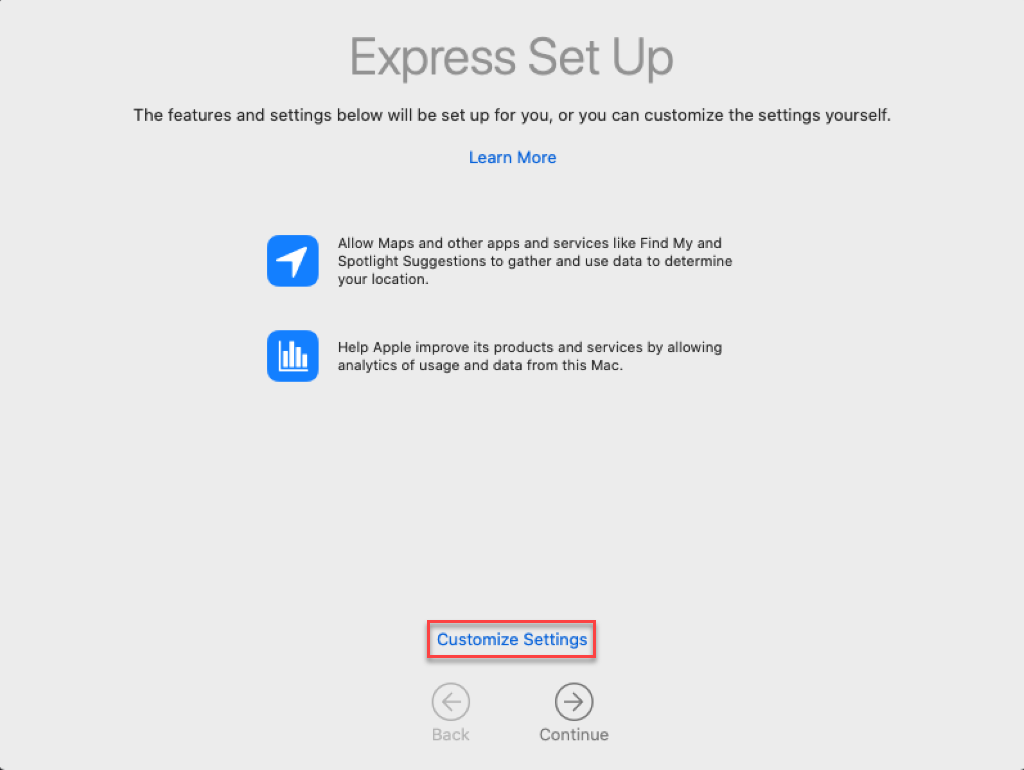
- Express Setup: Customize Settings
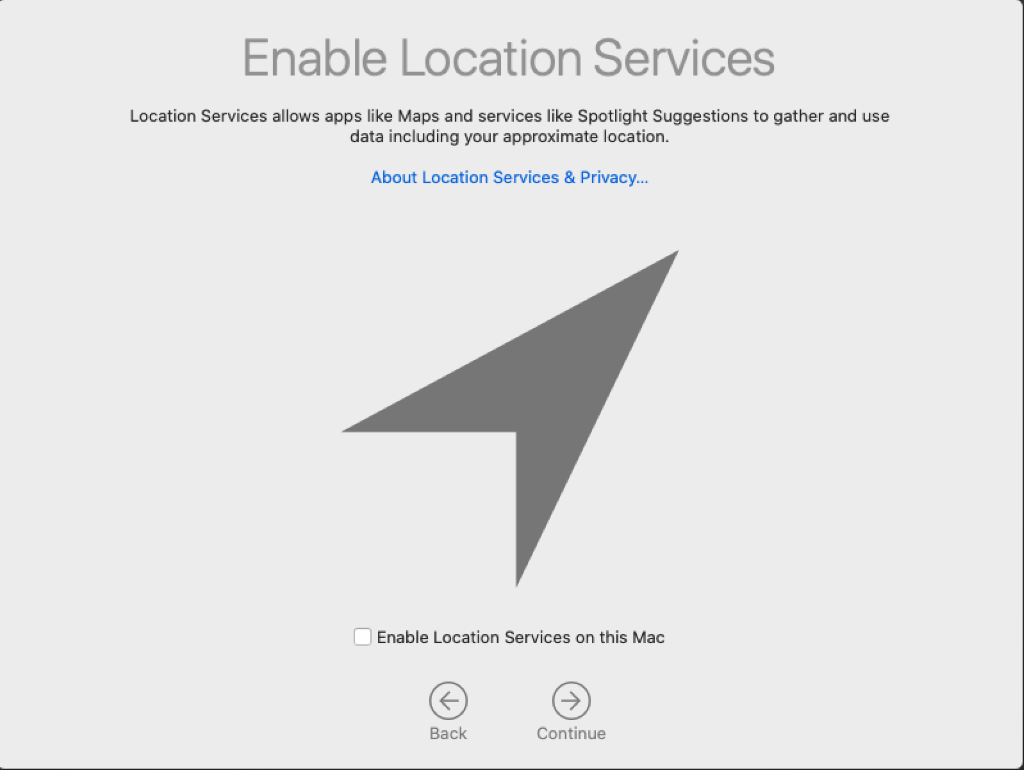
- Location Services: Disabled
- Analytics: Disabled
- Ask Siri: Disabled
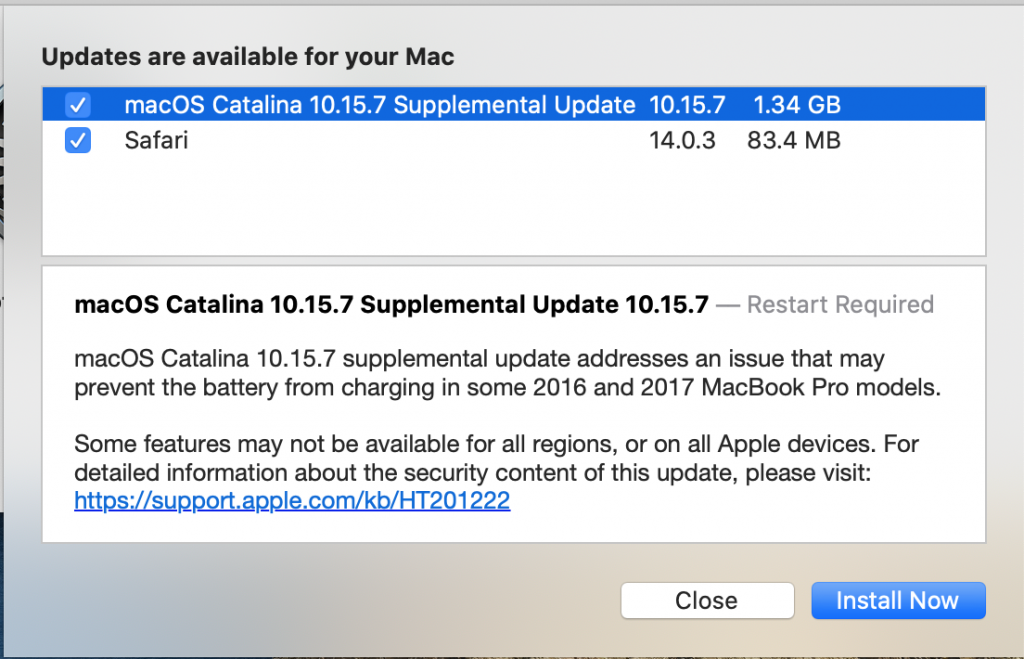
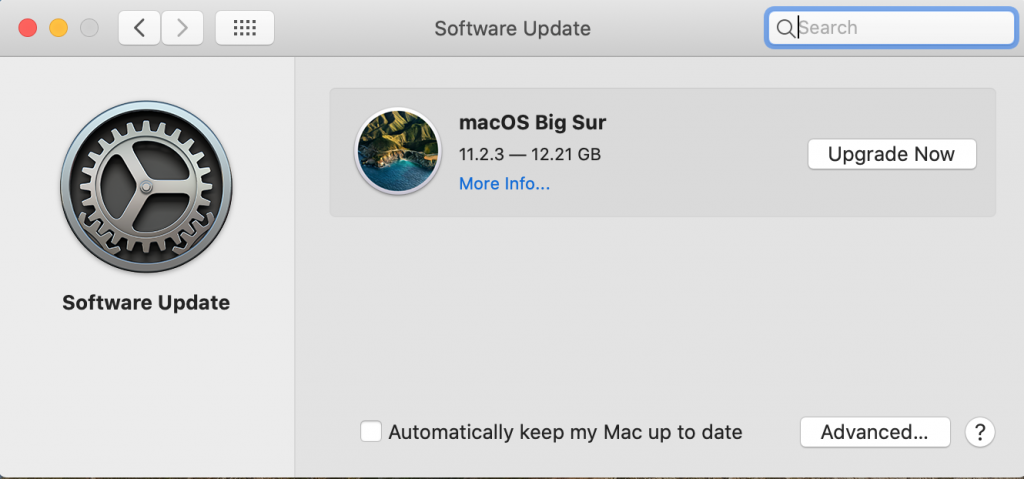
Before continuing on to JAMF enrollment, install all available macOS Catalina Security Updates. Be careful not to upgrade to Mac OS 11 (Big Sur).
Detailed Steps
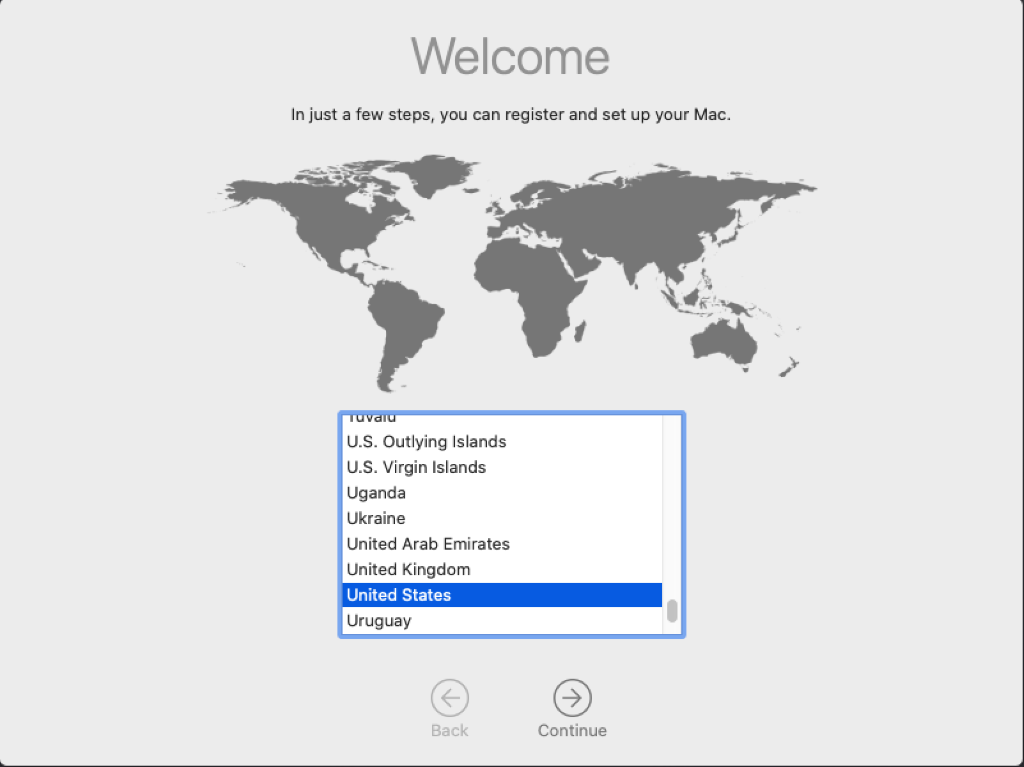
- At the Welcome Screen, Select United States and click Continue
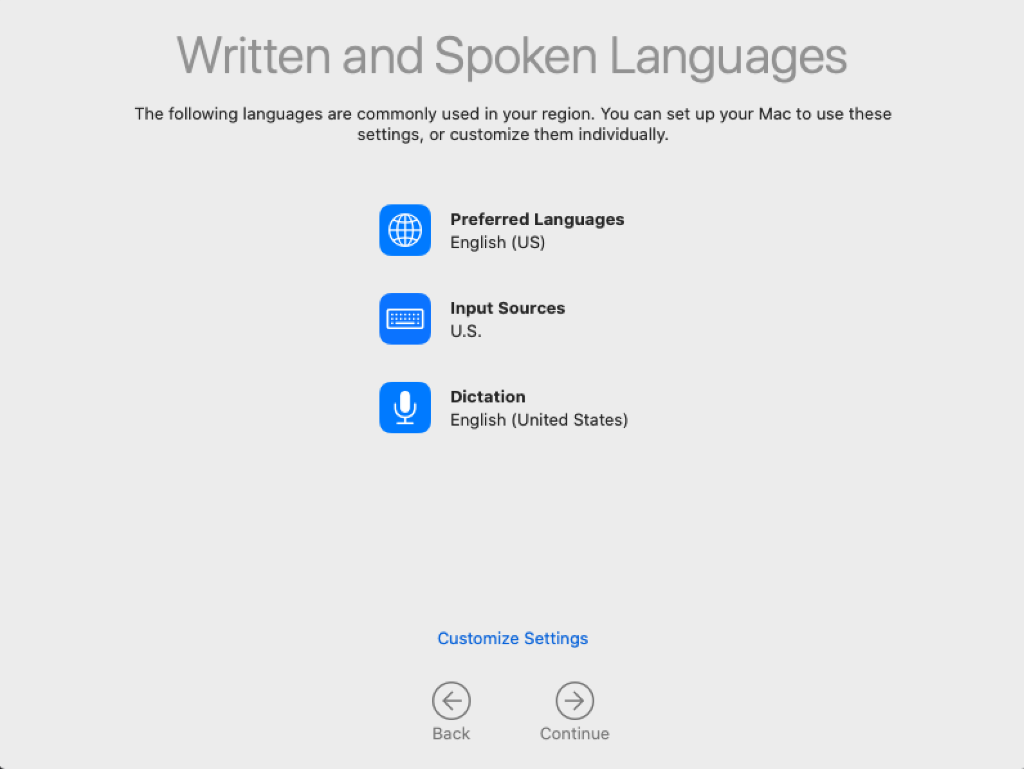
- Configure language preferences and click Continue
- Click Continue on the Data & Privacy notification
- Select Don’t transfer any information now and click Continue
- Click Set Up Later, and then click Skip in the pop-up window to confirm Apple ID Setup bypass.
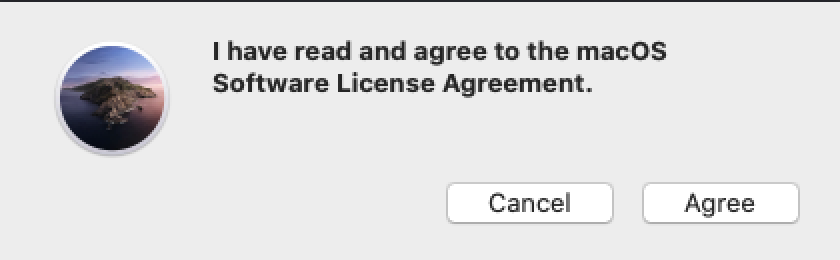
- Review the macOS Software License Agreement, then click Agree. A window will pop up to confirm the agreement has been read and agreed to. Click Agree.
- In the “Full name” field, type usgs_laps. Do not use a local admin naming standard for the local computer admin account. If an alternative account name is used, JAMF-managed configurations will fail to apply to the machine. Provide and verify a complex password for the account.

- At the “Express Set Up screen, click Customize Settings:
- Ensure that Enable Location Services on this Mac is Unchecked. Click Continue:
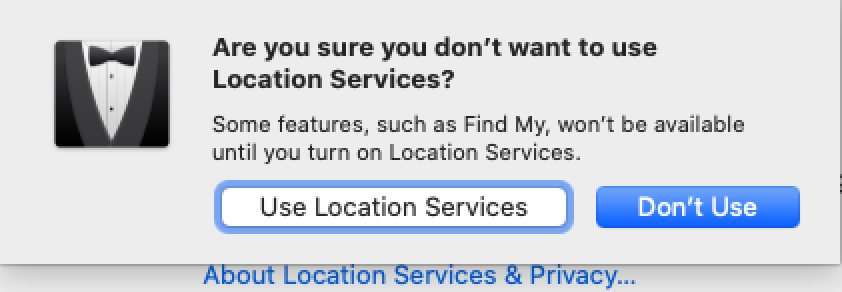
- At the pop-up window, click Don’t Use to confirm disablement of Location Services.
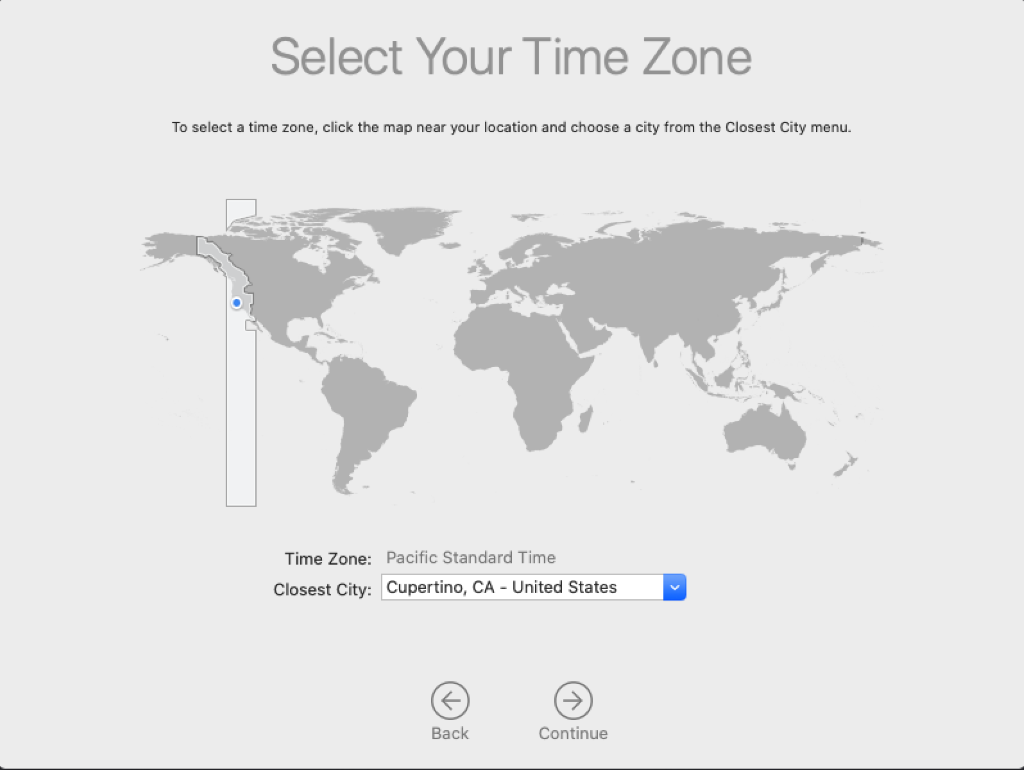
- Select the Closest City from the drop-down list to configure the Time Zone:
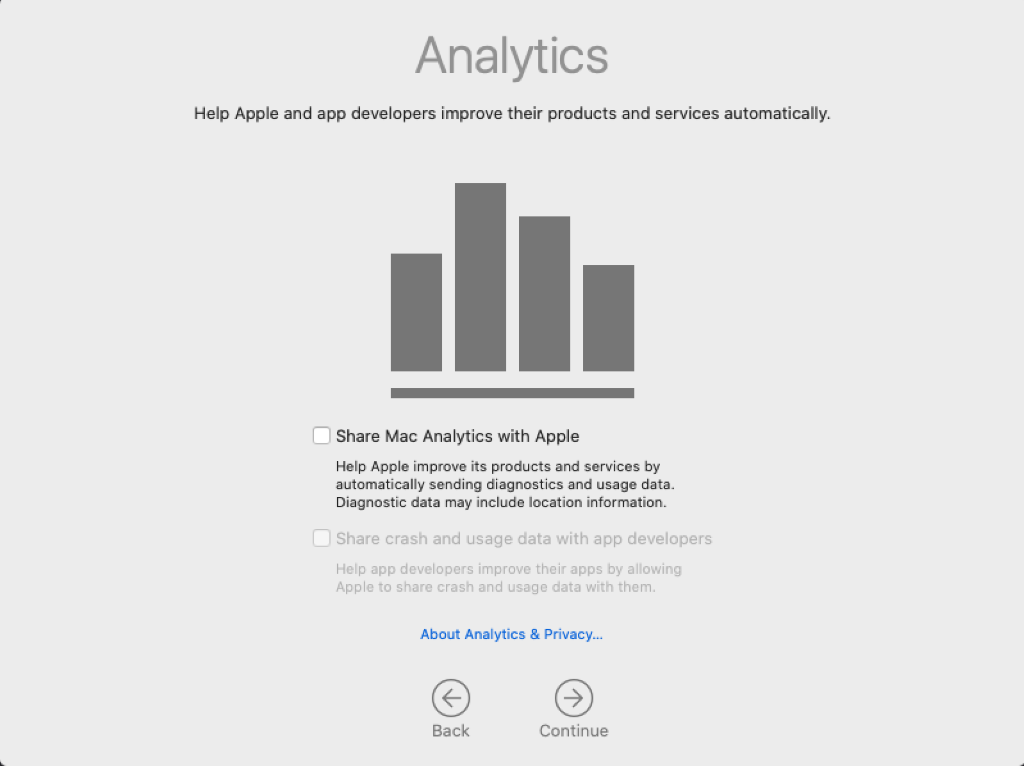
- Uncheck Share Mac Analytics with Apple and click Continue:
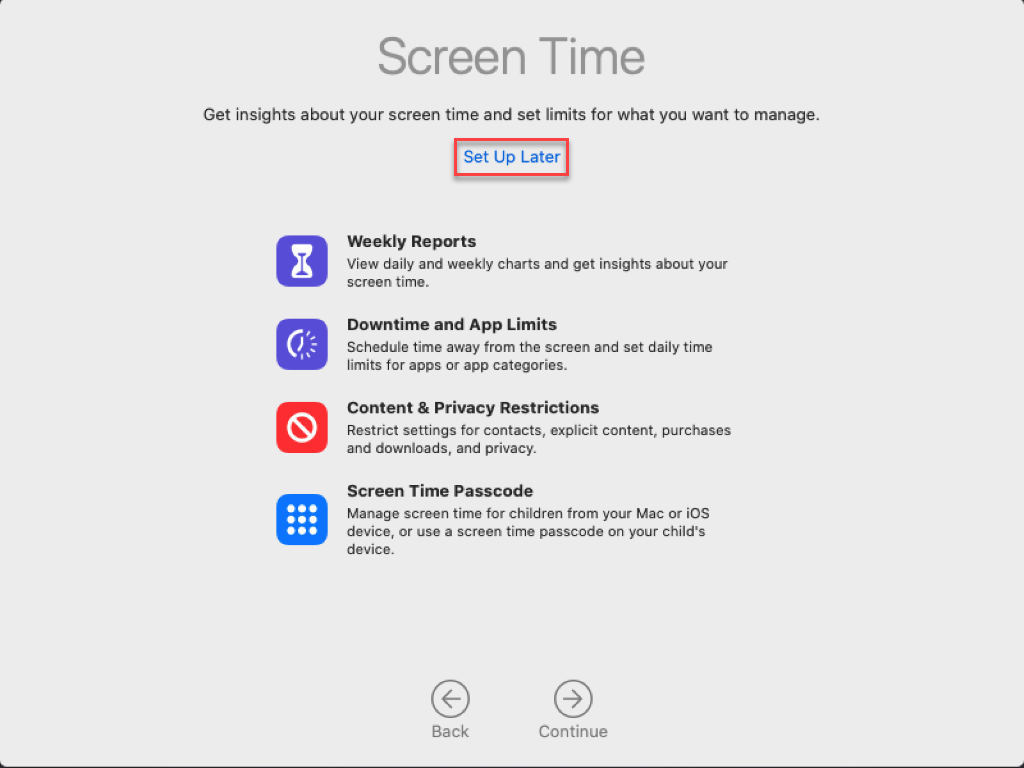
- Click Set Up Later to bypass Screen Time configuration:
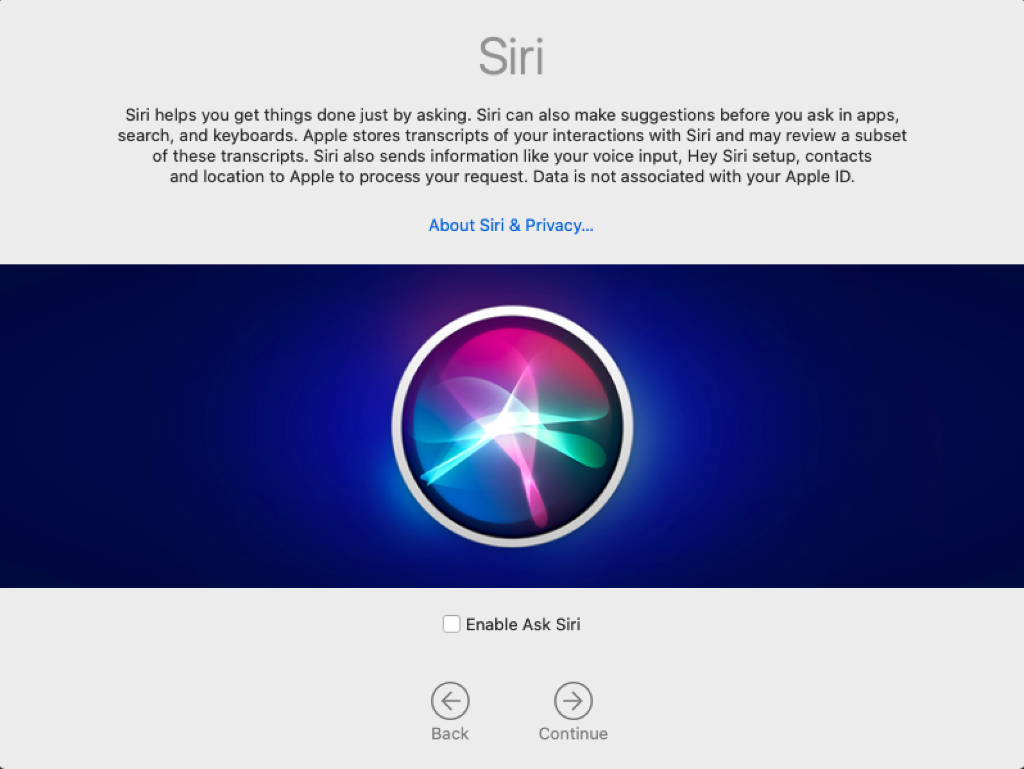
- Uncheck Enable Ask Siri and click Continue:
- Systems with a fingerprint reader will be prompted to set up Touch ID. Click Continue to skip this setup, as it is against policy.
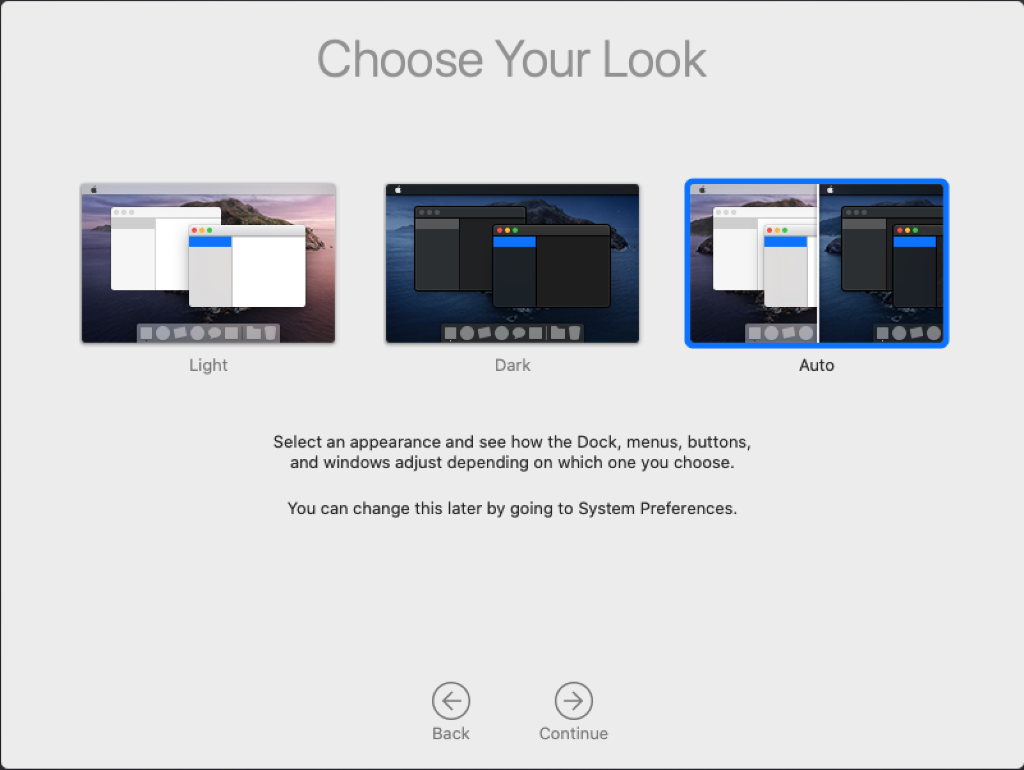
- Choose an appearance and click Continue:
Before continuing on to JAMF enrollment, install all available macOS Catalina Security Updates. Be careful not to upgrade to Mac OS 11 (Big Sur).
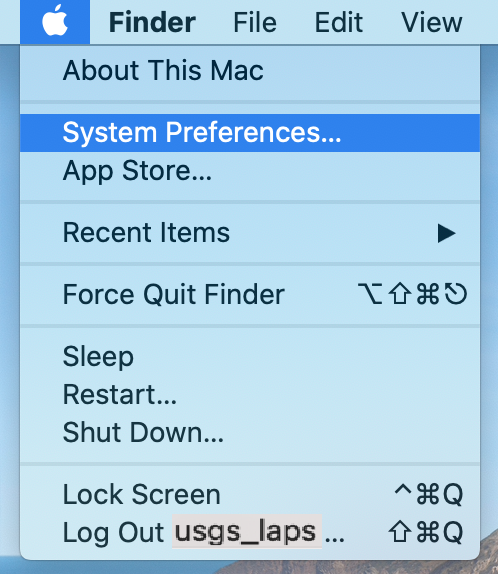
- In the Apple Menu, click System Preferences…
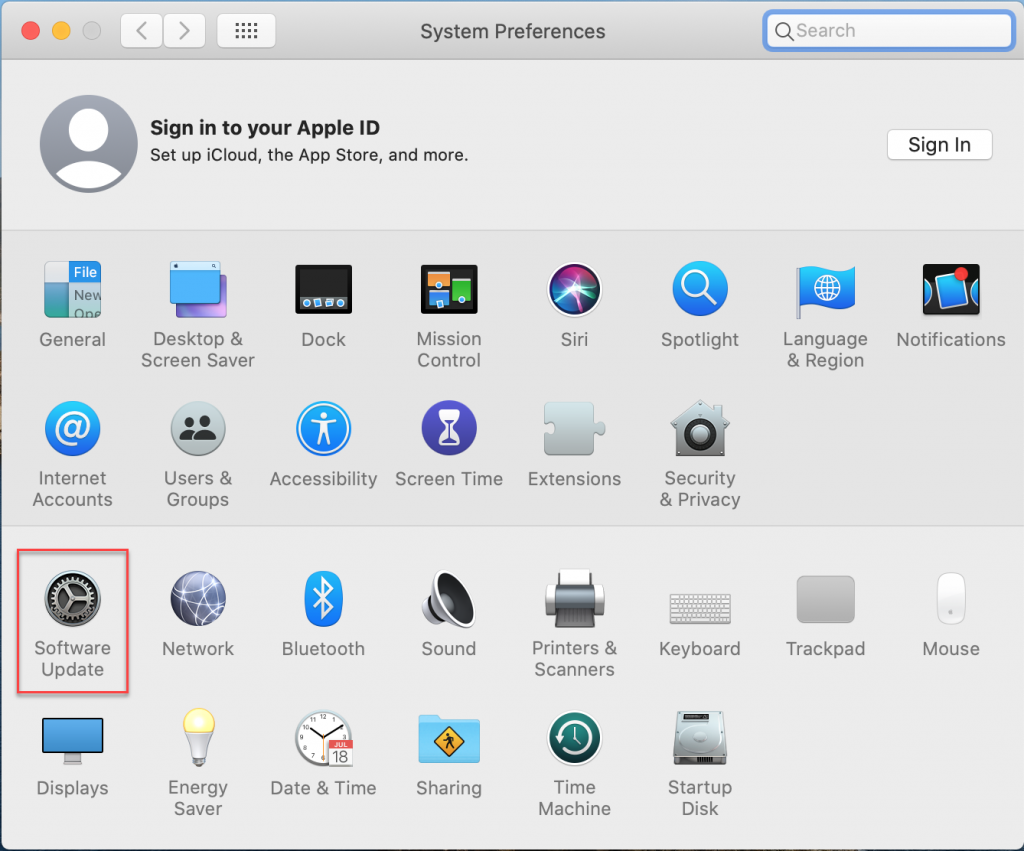
- Find and open Software Update:
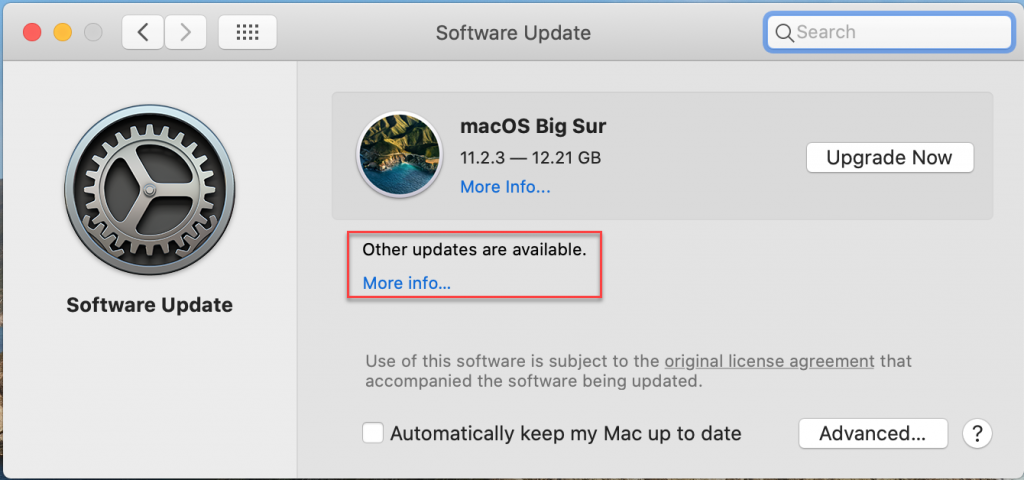
- Click on More info…, located beneath the words Other updates are available.
- Install all available “other” updates, and Restart, if needed:
- When all available (non-OS-upgrade) updates are installed, the Other updates are available message will be gone:
JAMF Enrollment
Install the DOI SSL Root Certificate
Using a computer that is connected to the VPN or internal DOI Network, download the DOI Root Cert from: http://sslhelp.doi.net/osx_instructions.html.
- Move the certificate file to the computer that is ready for JAMF onboarding
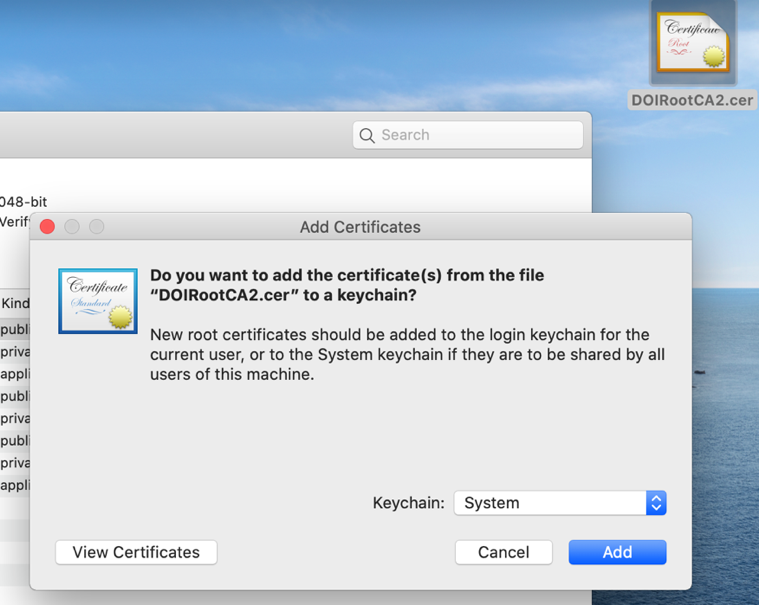
- Double-click the Certificate file to open macOS Keychain
- Click in the Keychain: menu and select System from the list. Click Add:
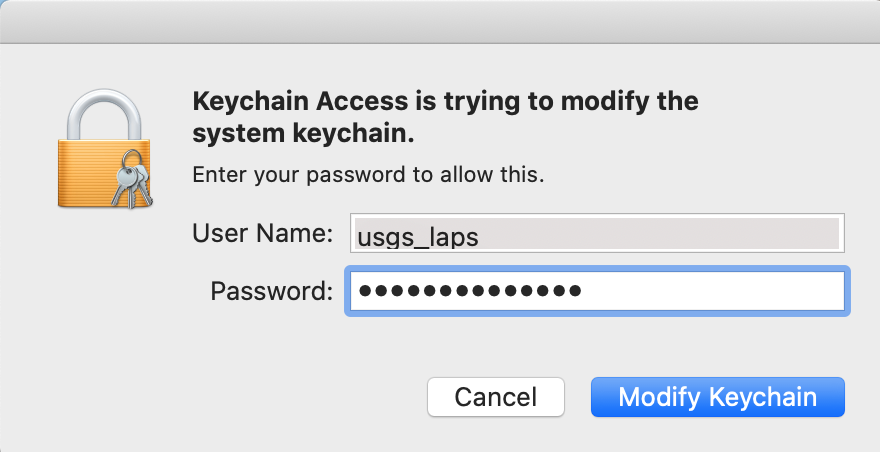
- Enter the local usgs_laps credentials and click Modify Keychain:
- In the Keychains window, select System, then double-click on DOIRootCA2.
- Expand the Trust section of the DOIRootCA2 certificate. Change the When using this certificate: option to Always Trust. Close the Certificate window.
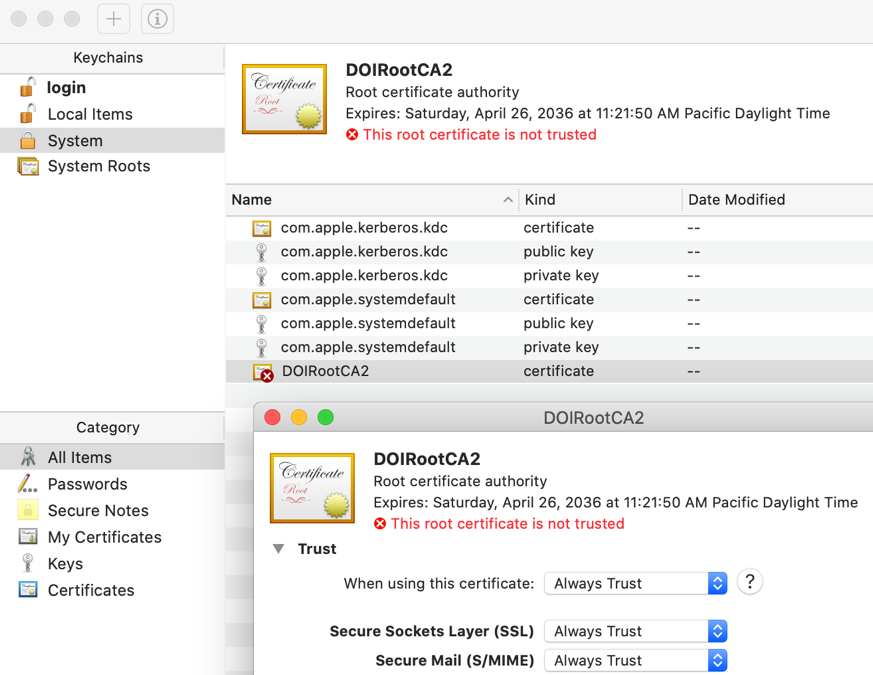
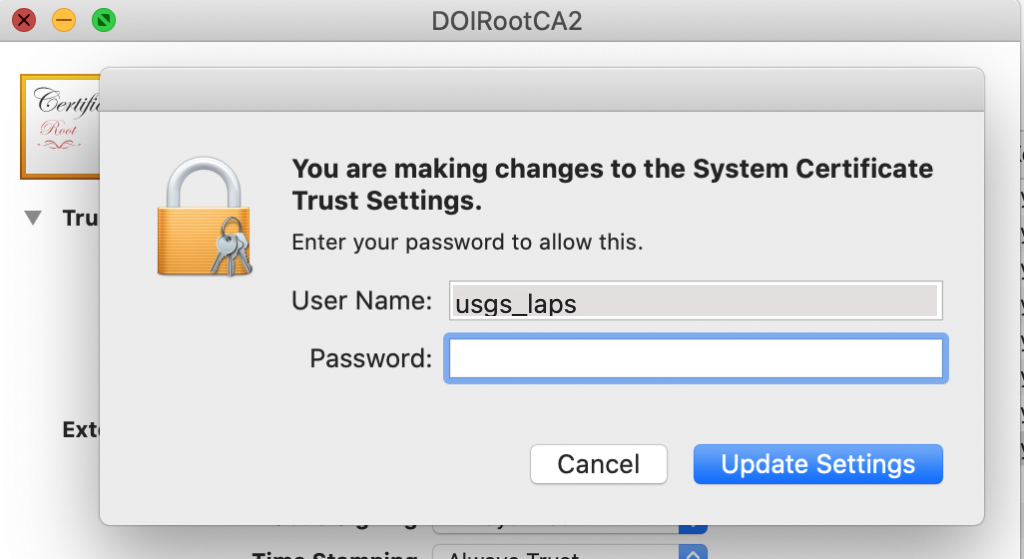
- Enter the local usgs_laps credentials and click Update Settings:
- Close the Keychains window.
JAMF Enrollment
Do Not Re-Enroll a JAMF-Managed Computer Without First Contacting the ES JAMF Team. The JAMF team will confirm if a re-enrollment is recommended and will clean up any old objects in JAMF prior to re-enrollment.
Before continuing on to the JAMF enrollment steps, install all available macOS Catalina Security Updates. Do not upgrade to BigSur.
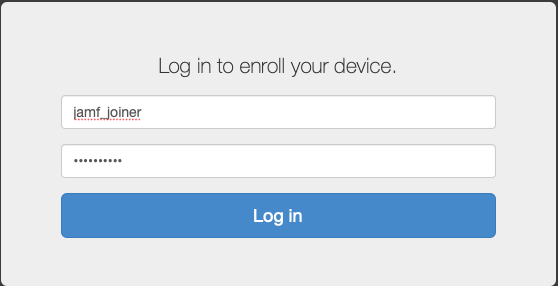
- Using Safari, visit https://jamf.usgs.gov:8443/enroll
- Enter the JAMF Joiner Credentials, and click “Log in”:
- Username: jamf_joiner
- Password: JoinMeNow!
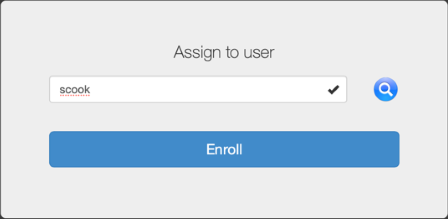
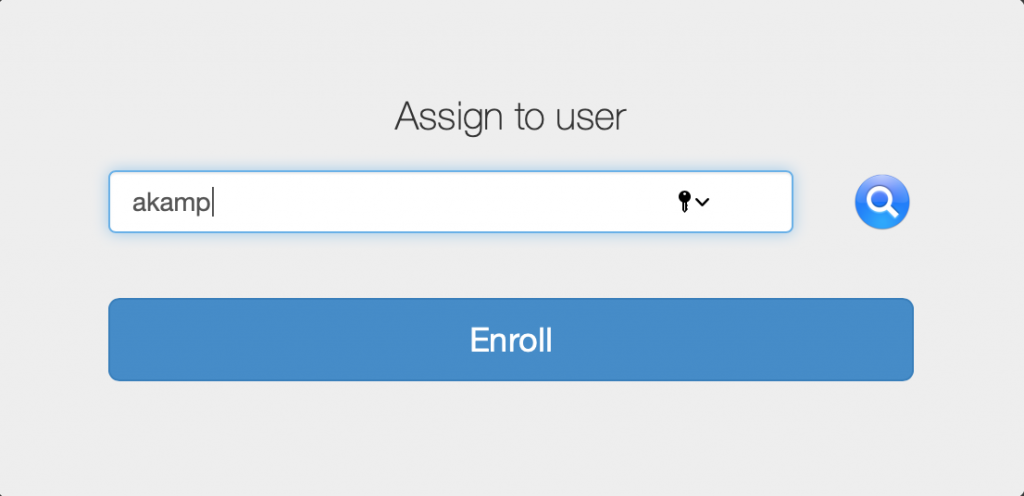
- At the Assign to user dialog box, enter the AD UPN of the user who will be assigned to the system.
- A checkmark will display if the username is found. Click the Enroll button:
- Alternatively, if no checkmark is displayed, click on the magnifying glass to search on the name entered:
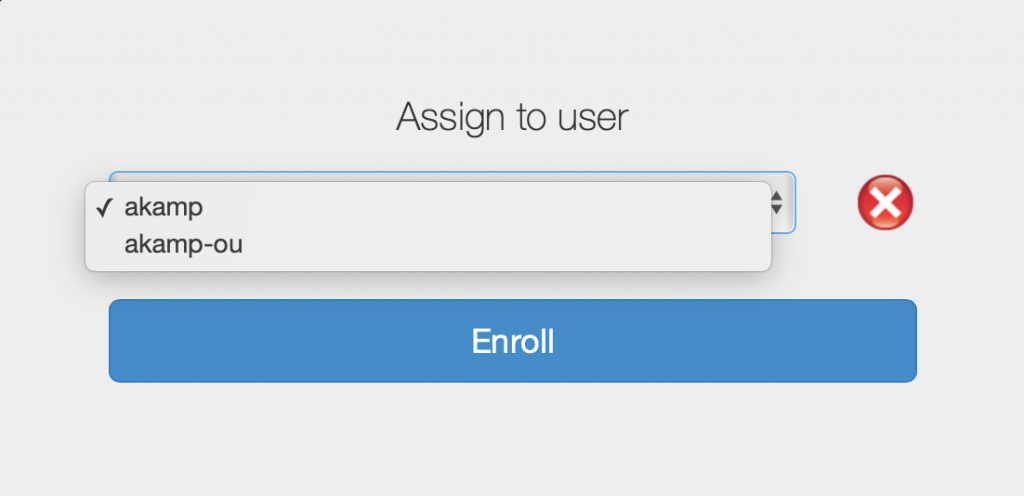
- If multiple accounts are found, an X will display along with a drop-down list of accounts found. Select the end-user’s regular (non-pr) account from the list and click the Enroll button:
Please Note: The Assign to User step populates several fields in the JAMF console that allows for easy identification of the primary user on a system. If an incorrect username is accidentally selected or if a device is reassigned, open a Service Desk ticket for the JAMF team to update the assigned user properties on the computer in the JAMF console.
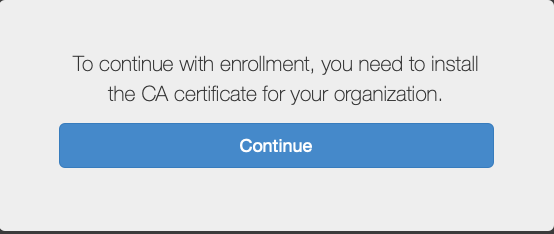
- Click “Continue” on the prompt to install the CA certificate:
- At the “Do you want to allow downloads…” prompt, click Allow
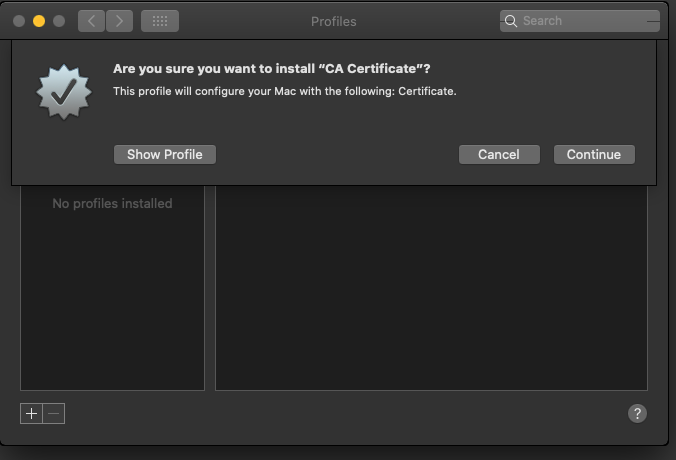
- Click Continue to Install the CA Certificate:
- Click Install to Install the “CA Certificate” Profile:
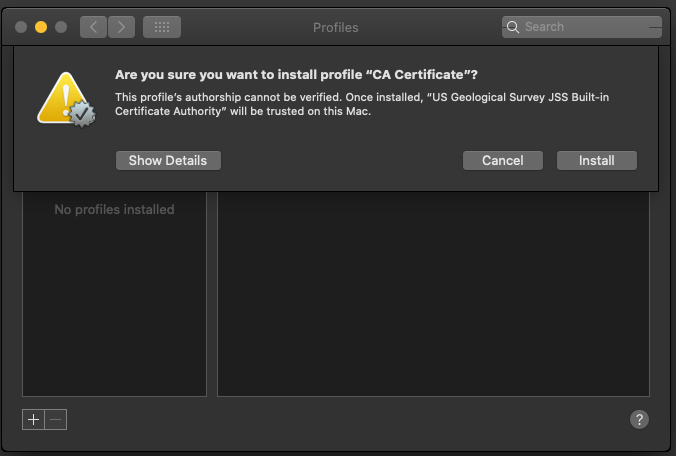
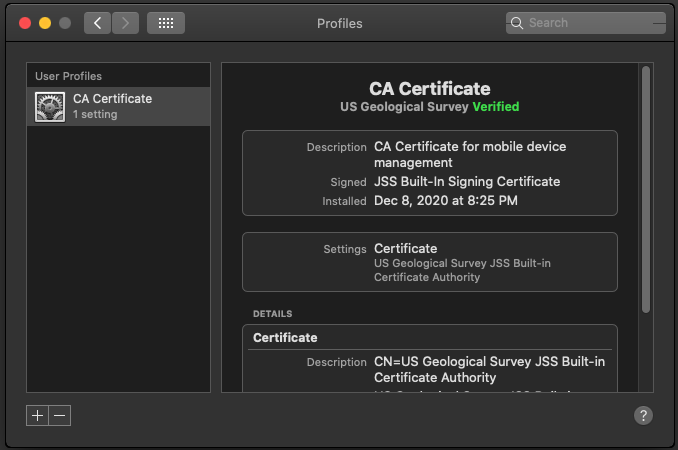
- CA Certificate installation is complete.
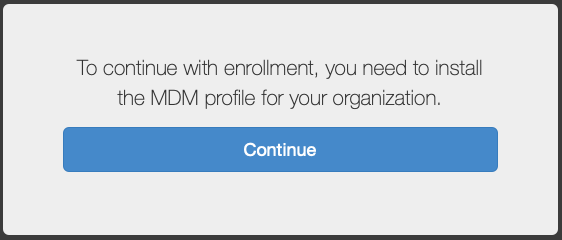
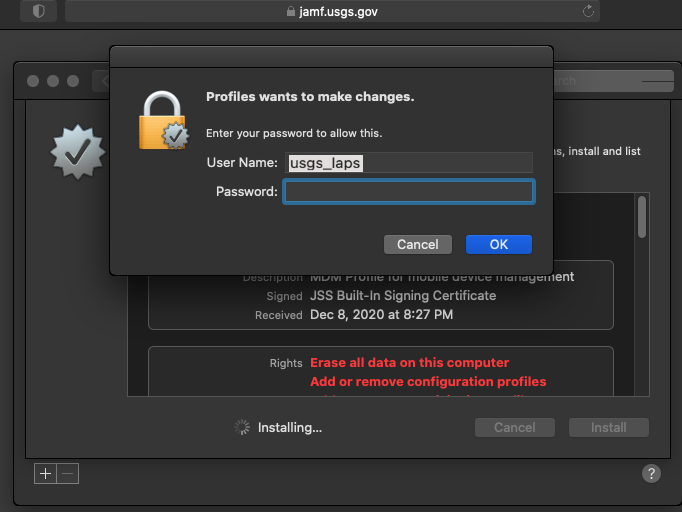
- Return to the Safari window and begin installation of the MDM certificate. At the prompt, click Continue to install the MDM profile:
- Click Install to install the MDM Profile:
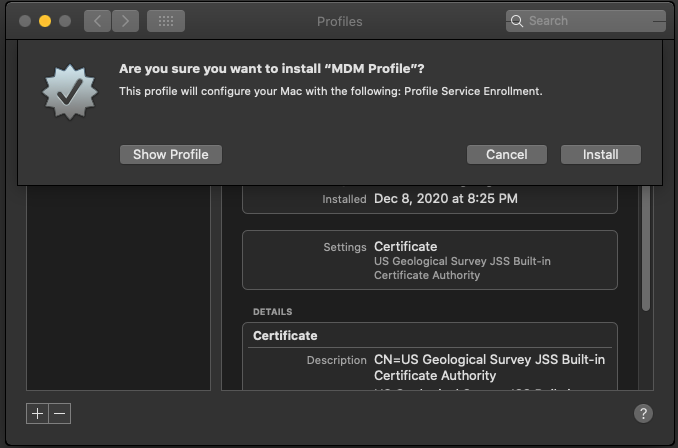
- At the prompt, enter the credentials for the local usgs_laps account and click OK
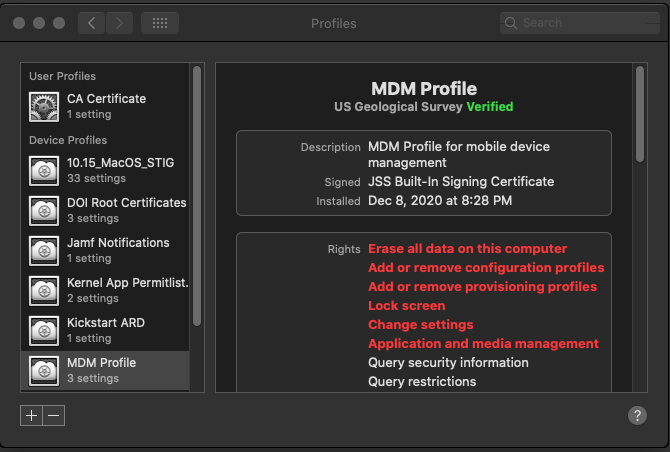
The Safari window will display that JAMF enrollment is completed. The computer will begin to process configurations that are applied and managed through JAMF, which includes applying the STIG, encrypting the hard drive with FileVault, SmartCard configuration, joining Active Directory, and installing and configuring baseline applications. It is recommended to stay at the computer while it processes these actions so that prompts can be responded to in a timely manner. Documentation for Baseline Configuration and Application Installation is in the section below.
Baseline Configuration and Application Installation
After JAMF Enrollment is completed, the computer will begin to process configurations that are applied and managed through JAMF, which include:
- Applying the USGS Mac STIG
- Hard Drive Encryption with FileVault
- SmartCard configuration
- GS.DOI.NET Active Directory Binding
- AA-System and AA-Subystem BigFix Keyfile Configuration
- Baseline Application Installation
It is recommended to stay at the computer while it processes these actions so that prompts can be responded to in a timely manner. Progress can be monitored by watching the contents of the jamf.log:
- Press the Command key + Space Bar to open spotlight search, and type “Console” to launch Console.app. Console.app can also be found in the Utilities folder.
- Watch the contents of jamf.log to monitor progress
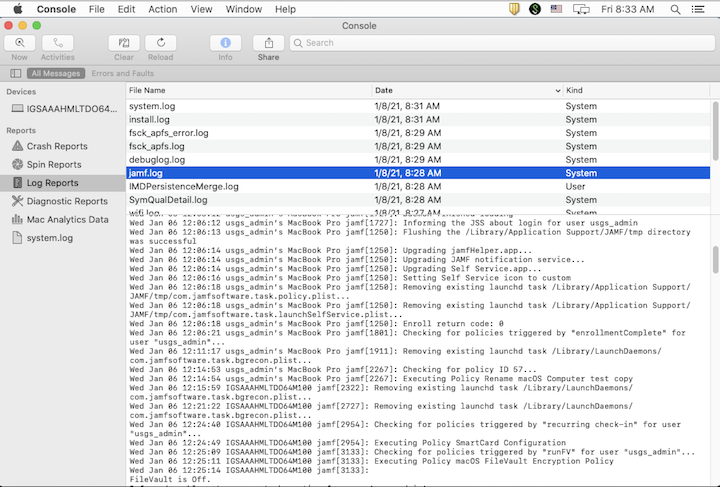
If at any point a manual JAMF check-in or update needs to be triggered, use the following commands in Terminal as the local usgs_laps user:
sudo jamf reconsudo jamf policyWait while additional device profiles are loaded. The list of Device Profiles will grow while this occurs. Depending on network latency, this can take 1 or 2 minutes:
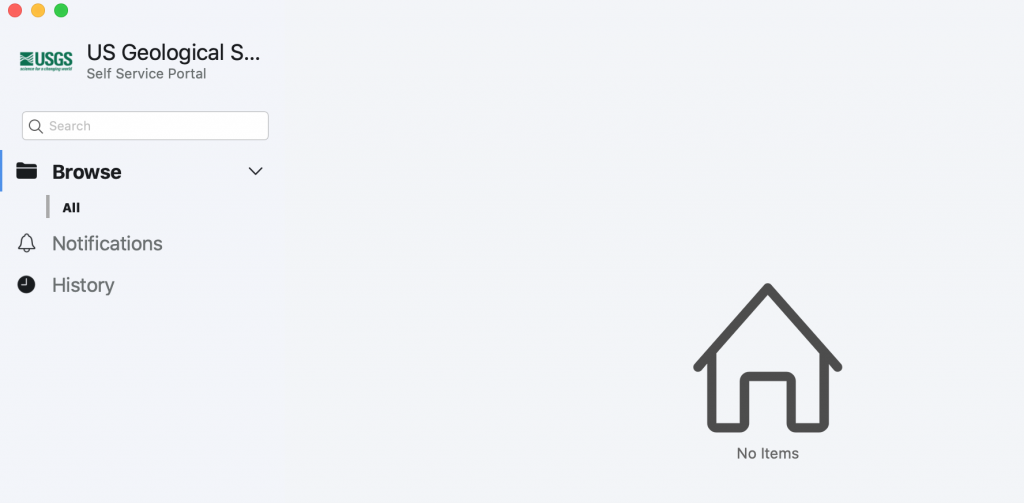
- The USGS Self Service Portal will install:
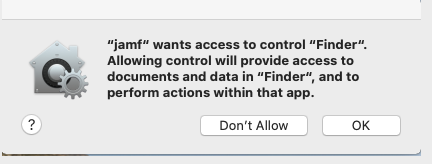
- A pop-up window will display, asking to give JAMF permission to control Finder. Click OK:
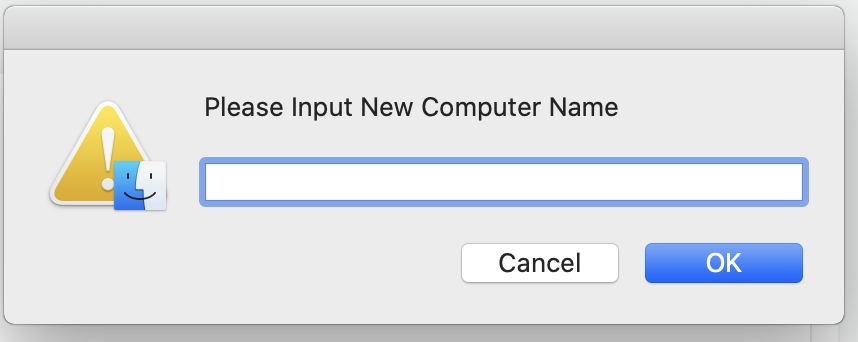
- When the “Please Input New Computer Name” prompt is displayed, enter the hostname of the computer, IN ALL CAPS, following USGS Enterprise Naming Standards. AD Binding will fail if naming standards are not followed.
- FileVault encryption will be ready to begin. At the prompt, click OK, then wait 2-3 minutes and logout:
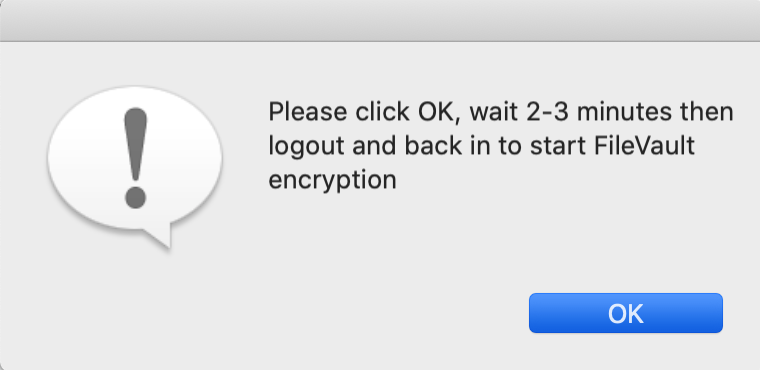
- Follow the prompts until the local account usgs_laps is logged back in.
Application installation will occur automatically.
The following list contains all of the baseline applications that will begin to install by both JAMF and BigFix. If BigFix prompts for a patch reboot, it is recommended to wait to reboot until all validation steps in this section have been completed.
- USGS Self Service Portal
- BigFix (see below for key-file configuration steps)
- MS Defender for Endpoint (installed by BigFix)
- NoMAD
- Office 365
- Teams
- OneDrive
- Edge
- Pulse Secure
- Adobe Acrobat Reader
When prompted, enter the System and Subsystem AA Boundary codes. For example, to put the keyfiles in place for a system in the Water Subsystem of 045, the values WAT would be entered at the first prompt and the value 045 would be entered at the second prompt.
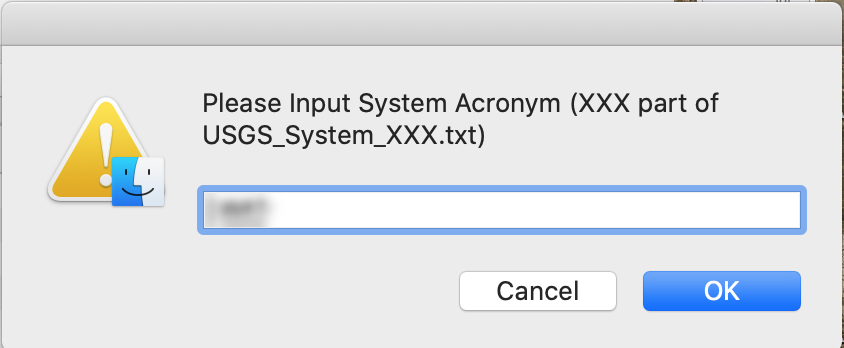
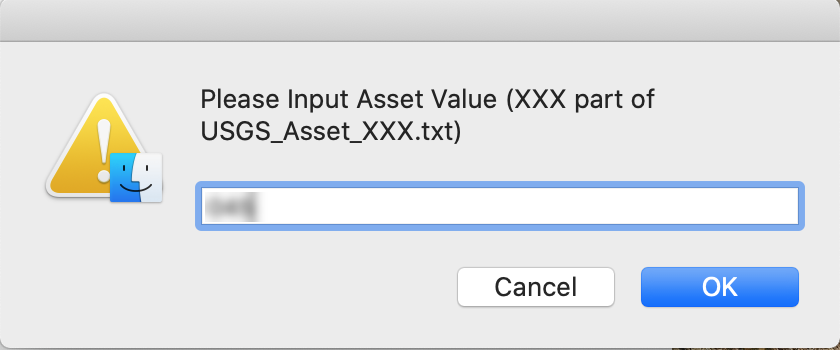
If the AA Boundary information is unknown, please see the USGS BigFix A&A Boundary Properties spreadsheet and collaborate with local BigFix operators and webreports viewers to confirm the keyfile values that should be used. Values entered incorrectly should be fixed manually by editing the file names of the keyfiles, which are located at: Macintosh HD\Library\Application Support\BigFix\BES Agent.
Validate AD Joining has completed using Directory Utility.
- Press the Command key + Space Bar to open spotlight search, and type “Directory Utility”.
- In the Directory Editor section, change the “in node” to /Active Directory/GS/gs.doi.net. Domain user accounts should begin to populate in the left-hand pane.

- If AD Binding was successful, local COUAs should move the AD object for the computer out of the OU DI\ECM\OSD Computers.
- If AD Binding was not successful, email the Service Desk to open a ticket in the JAMF queue for troubleshooting and assistance re-binding the system.
Validate MS Defender is Running
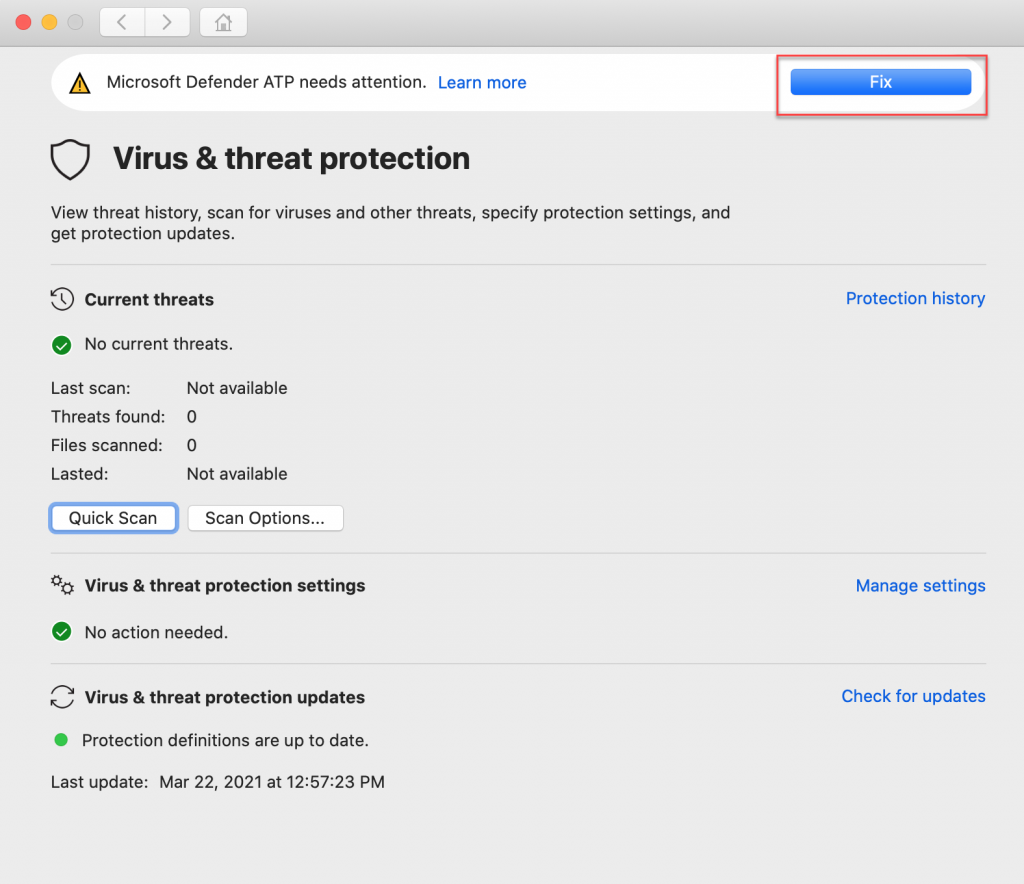
On the menu bar, click on the Defender Icon and Select Open Microsoft Defender ATP.
- If there is a message that says Microsoft Defender ATP needs attention, click on the Fix button:
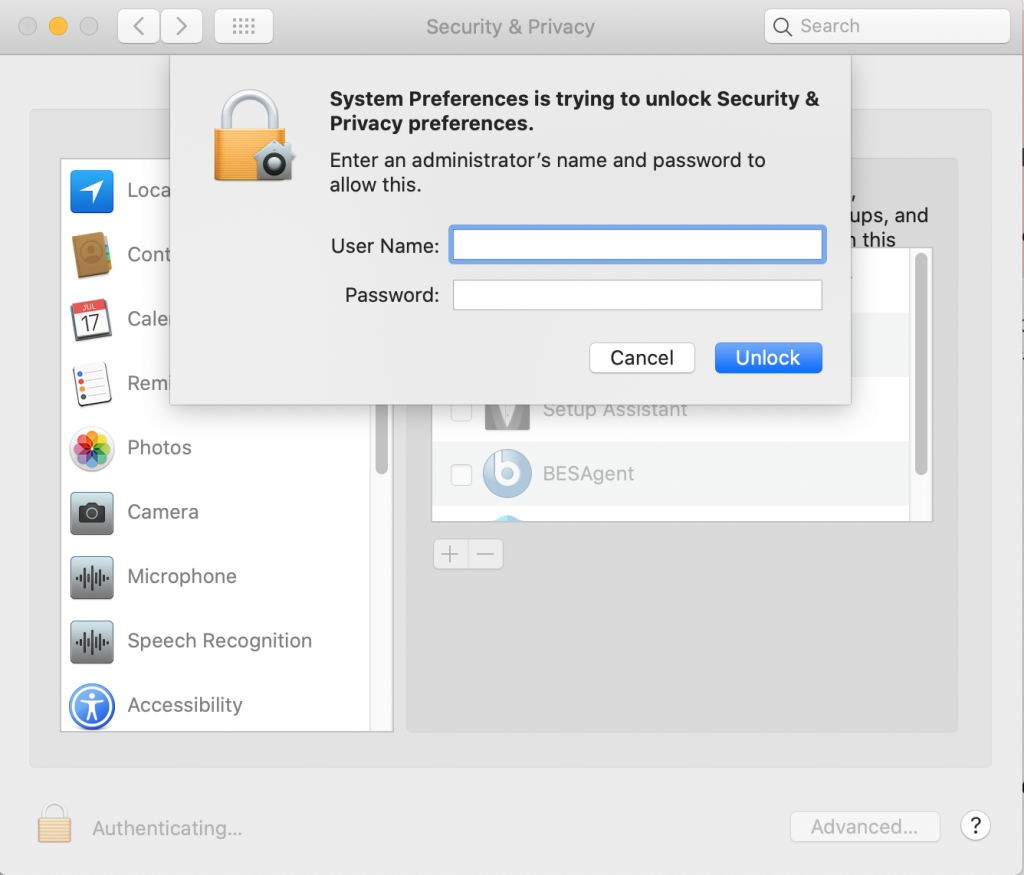
- The Security & Privacy window opens on the Privacy pane. Click on the Lock icon and authenticate with the local usgs_laps account credentials:
- On the left, scroll down and click Full Disk Access if it is not already selected, and then check the box next to Microsoft Defender ATP at the bottom of the list on the right:
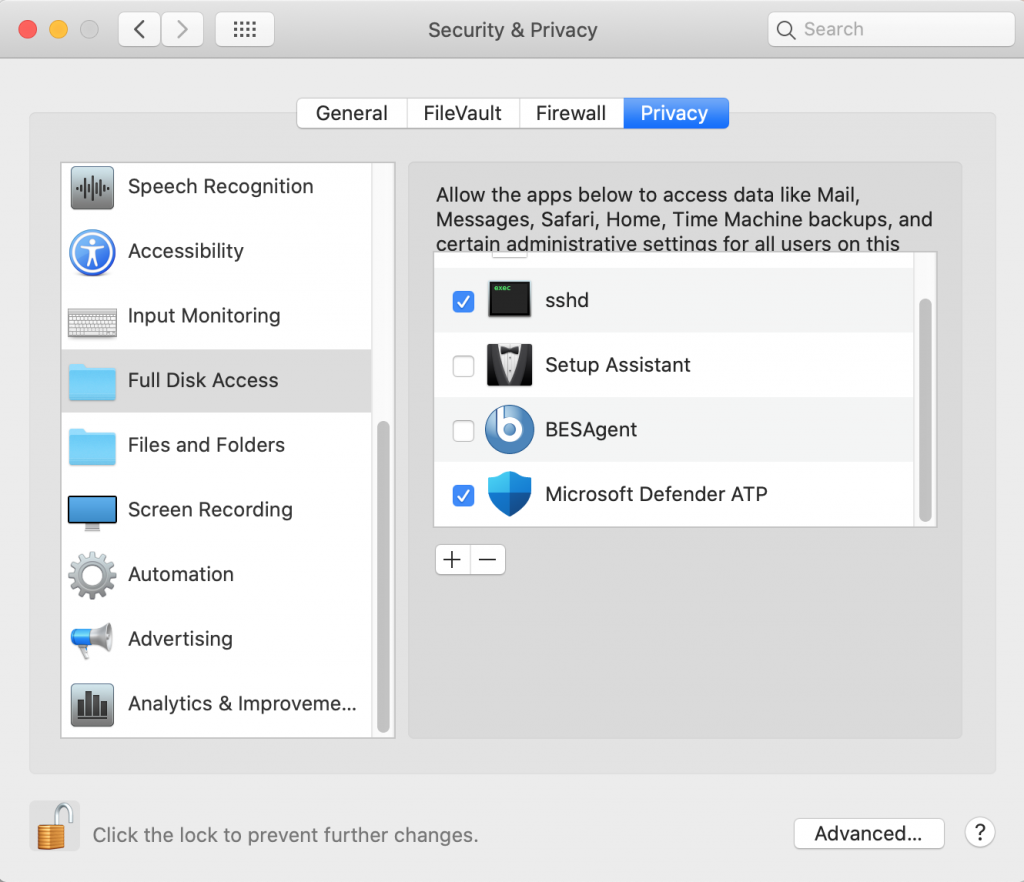
- Close the Security & Privacy window. Validate that the error message in Microsoft Defender ATP has cleared.
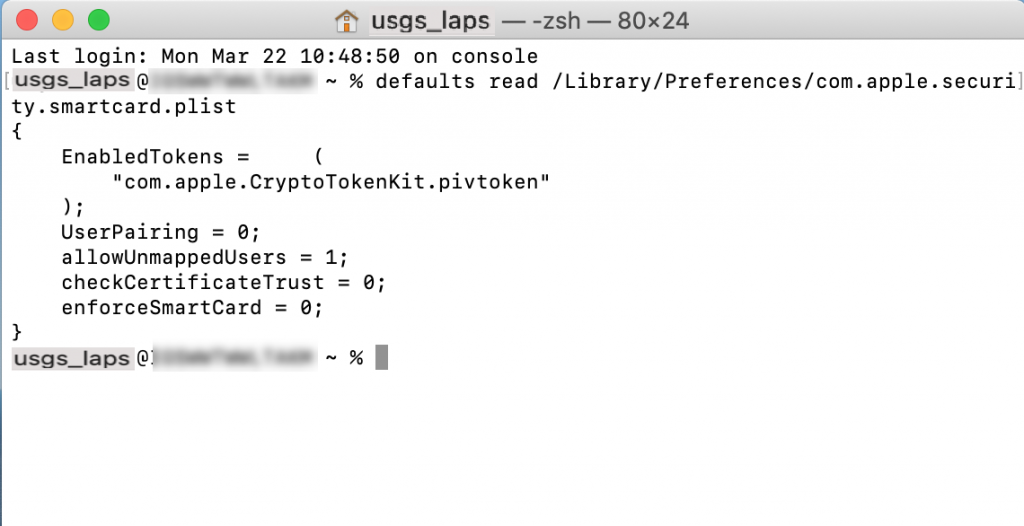
Validate and test SmartCard authentication.
- Press the Command key + Space Bar to open spotlight search, and type “Terminal”. Terminal.app can also be found in the Utilities folder.
- In Terminal, type the following and hit Enter:
defaults read /Library/Preferences/com.apple.security.smartcard.plist- Validate that the following is returned:
{
     EnabledTokens=   (
     "com.apple.CryptoTokenKit.pivtoken"
     );
     Logging=1;
     UserPairing=0;
     allowUnmappedUsers=1;
     checkCertificateTrust=0;
     enforceSmartCard=0;
}
- Test SmartCard login:
- Log out of the local “usgs_laps” account
- When the smartcard is connected, the logon screen should display a prompt for a PIN.
- Log on with a smartcard credential.
- Log out.
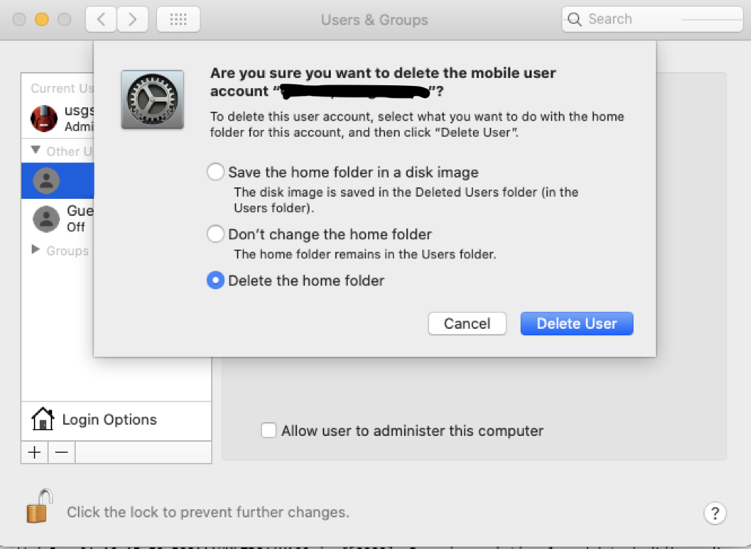
- If needed, clean up the user profile that was created during the SmartCard logon test:
- Login with the local “usgs_laps” account
- Open System Preferences, Users & Groups
- Click on the Lock and authenticate
- Click to select the user, then click the “-” symbol
- Select the option to delete the home folder
- Click Delete User
Enrollment Validation
Prior to giving the Mac computer to the customer, the following items must be validated to ensure that JAMF Enrollment was successful and that the computer is compliant with security requirements:
- Verify that the hostname, localhost name, and computer name all match, using the following terminal commands:
scutil --get ComputerNamescutil --get HostNamescutil --get LocalHostName- Verify BigFix Client and Keyfile health by validating the system is actively reporting in and viewable by local BigFix WebReports operators
- The AD Computer object has been moved out of the DI\ECM\OSD Computers OU to the Local OU
- Verify that MS Defender is installed and running.
- Verify that Pulse connects
- Local standard applications are installed
- User data restored, if applicable