cacls
The cacls command line tool allows administrators to display or modify discretionary access control lists (DACL) on specified files using the command line instead of the GUI.
calcsThe cacls command line tool allows administrators to display or modify discretionary access control lists (DACL) on specified files using the command line instead of the GUI. If you use the /g or /p arguments, be sure to use the /e argument as well if you want to preserve the existing DACL on the target object.
Command syntax
cacls FileName [/t] [/e [/rUser […]]] [/c] [/gUser:Permission ] [/pUser:Permission […]] [/dUser […]]
FileName Displays ACLs for specified file(s).
/t Changes DACLs of specified files in the current directory and all subdirectories.
/e Edits a DACL instead of replacing it.
/r User Revokes access rights for the specified user, is not valid without /e.
/c Continues to change DACLs, ignoring errors.
/g User:Permission Grants access rights to the specified user. The following table lists valid values for Permission. ValueDescriptionn Noner Readw Writec Change (Write)fFull Control
/p User:Permission Replaces access rights for the specified user. The following table lists valid values for Permission. ValueDescriptionnNonerReadwWritecChange (Write)fFull Control
/d User Denies access for the specified user.
/? Displays help at the command prompt.
Wildcards can be used to specify more that one file in a command. You can specify more than one user in a command.
Abbreviations:
CI – Container Inherit. – The ACE will be inherited by directories.
OI – Object Inherit. – The ACE will be inherited by files.
IO – Inherit Only. – The ACE does not apply to the current file/directory.
Recommendations and Examples
The following examples show applications of the cacls command line tool.
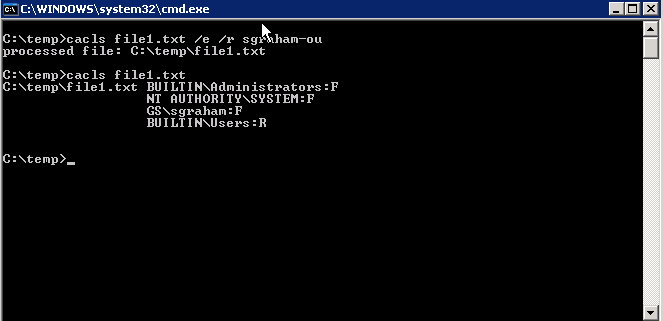
In this example, the cacls command is used to show the current permission settings on a single file with no arguments.
Command – cacls file1.txt

In this example, the cacls command is used to show how to edit the DACL on a file by revoking permissions for a single user. The cacls command is then used with the filename option to show the new set of permissions on the file.
Command – cacls file1.txt /e /r username; cacls file1.txt
In this example, the cacls command is used to show how to edit the DACL on a file by granting permission to an additional user, by adding to the existing DACL. A wildcard is used to give this user full (F) access to all files in the directory starting with the string file. The cacls command is then used with the filename option and a wildcard to show the new set of DACLs on the affected files.
Command – cacls file* /e /g username:F; cacls file*

For More Information
Microsoft Cacls Page
dsquery
The dsquery command line tool allows users and administrators to query the Active Directory database according to specified criteria.
dsqueryThe dsquery command line tool allows users and administrators to query the Active Directory database according to specified criteria. Each of the following dsquery commands finds objects of a specific object type, with the exception of dsquery *, which can query for any type of object:
dsquery computer – finds computers in the directory.
dsquery contact – finds contacts in the directory.
dsquery subnet – finds subnets in the directory.
dsquery group – finds groups in the directory.
dsquery ou – finds organizational units in the directory.
dsquery site – finds sites in the directory.
dsquery server – finds domain controllers in the directory.
dsquery user – finds users in the directory.
dsquery quota – finds quota specifications in the directory.
dsquery partition – finds partitions in the directory.
dsquery * – finds any object in the directory by using a generic LDAP query.
The results from a dsquery search can be piped as input to one of the other directory service command-line tools, such as dsget, dsmod, dsmove, or dsrm.
Command syntax
dsquery computer [{StartNode| forestroot | domainroot}] [-o {dn | rdn | samid}] [-scope {subtree | onelevel | base}] [-name Name] [-desc Description] [-samid SAMName] [-inactive NumberOfWeeks] [-stalepwd NumberOfDays] [-disabled] [{-s Server| -d Domain}] [-u UserName] [-p {Password|*}] [-q] [-r] [-gc] [-limit NumberOfObjects] [{-uc | -uco | -uci}]
dsquery contact [{StartNode| forestroot | domainroot}] [-o {dn | rdn}] [-scope {subtree | onelevel | base}] [-name Name] [-desc Description] [{-s Server| -d Domain}] [-u UserName] [-p {Password| *}] [-q] [-r] [-gc] [-limit NumberOfObjects] [{-uc | -uco | -uci}]
dsquery group [{StartNode| forestroot | domainroot}] [-o {dn | rdn | samid}] [-scope {subtree | onelevel | base}] [-name Filter] [-desc Filter] [-samid Filter] [{-s Server| -d Domain}] [-u UserName] [-p{Password| *}] [-q] [-r] [-gc] [-limit NumberOfObjects] [{-uc | -uco | -uci}]
dsquery ou [{StartNode| forestroot | domainroot}] [-o {dn | rdn}][-scope {subtree | onelevel | base}][-name Name] [-desc Description] [{-s Server| -d Domain}] [-u UserName] [-p {Password| *}] [-q] [-r] [-gc] [-limit NumberOfObjects] [{-uc | -uco | -uci}]
dsquery site [-o {dn | rdn}] [-name Name] [-desc Description] [{-s Server| -d Domain}] [-u UserName] [-p {Password|*}] [-q] [-r] [-gc] [-limit NumberOfObjects] [{-uc | -uco | -uci}]
dsquery server [-o {dn | rdn}] [-forest] [-domain DomainName] [-site SiteName] [-name Name] [-desc Description] [-hasfsmo {schema | name | infr | pdc | rid}] [-isgc] [{-s Server| -d Domain}] [-u UserName] [-p {Password|*}] [-q] [-r] [-gc] [-limit NumberOfObjects] [{-uc | -uco | -uci}]
dsquery user [{StartNode| forestroot | domainroot}] [-o {dn | rdn | upn | samid}] [-scope {subtree | onelevel | base}] [-name Name] [-desc Description] [-upn UPN] [-samid SAMName] [-inactiveNumberOfWeeks] [-stalepwd NumberOfDays] [-disabled] [{-s Server| -d Domain}] [-u UserName] [-p {Password| *}] [-q] [-r] [-gc] [-limit NumberOfObjects] [{-uc | -uco | -uci}]
dsquery quota {domainroot |ObjectDN} [-o {dn | rdn}] [-acct Name] [-qlimit Filter] [-desc Description] [{-s Server| -d Domain}] [-u UserName] [-p {Password|*}] [-q] [-r] [-gc] [-limit NumberOfObjects] [{-uc | -uco | -uci}]
dsquery partition [-o {dn | rdn}] [-part Filter] [{-s Server| -d Domain}][-u UserName] [-p {Password|*}] [-q] [-r] [-gc] [-limit NumberOfObjects] [{-uc | -uco | -uci}]
dsquery * [{ObjectDN| forestroot | domainroot}] [-scope {subtree | onelevel | base}] [-filter LDAPFilter] [-attr {AttributeList|*}] [-attrsonly] [-l][{-s Server| -d Domain}] [-u UserName] [-p {Password|*}] [-q] [-r] [-gc] [-limit NumberOfObjects] [{-uc | -uco | -uci}]
Recommendations and Examples
The following examples show applications of the dsquery command line tool.
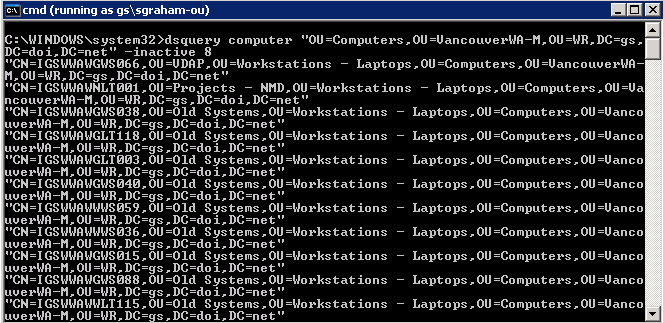
In this example, the dsquery command is used to show all computer accounts in a specified OU that have not been connected to the GS network during the previous 8 weeks.
Command – dsquery computer “OU=Computers,OU=VancouverWA-M,OU=WR,DC=gs,DC=doi,DC=net” -inactive 8
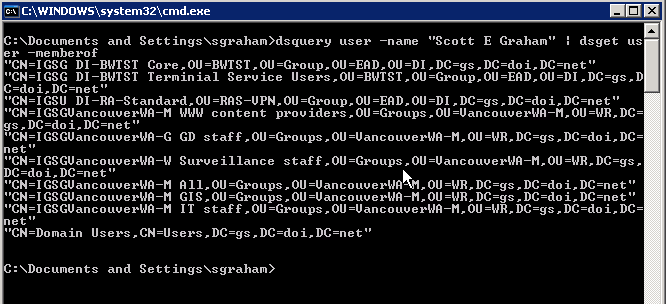
In this example, the dsquery command is used to obtain the DN of the user account. The result of the dsquery command is then piped to the dsget command to find which groups this user is a member of.
Command – dsquery user -name “Scott E Graham” | dsget user -memberof
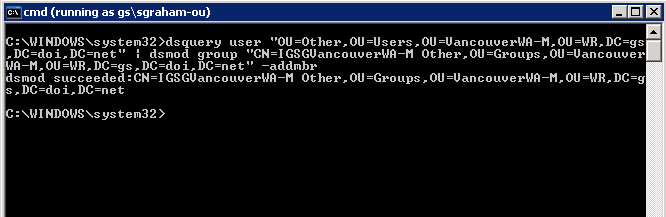
In this example, the dsquery command finds all user accounts in a specified OU. The result of the dsquery command is then piped to the dsmod command to add each of the user accounts to a group.
Command – dsquery user “OU=Other,OU=Users,OU=VancouverWA-M,OU=WR,DC=gs,DC=doi,DC=net” | dsmod group “CN=IGSGVancouverWA-M Other,OU=Groups,OU=VancouverWA-M,OU=WR,DC=gs,DC=doi,DC=net” -addmbr
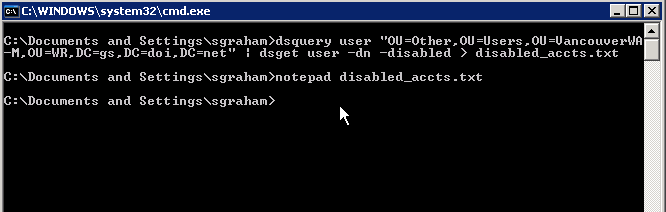
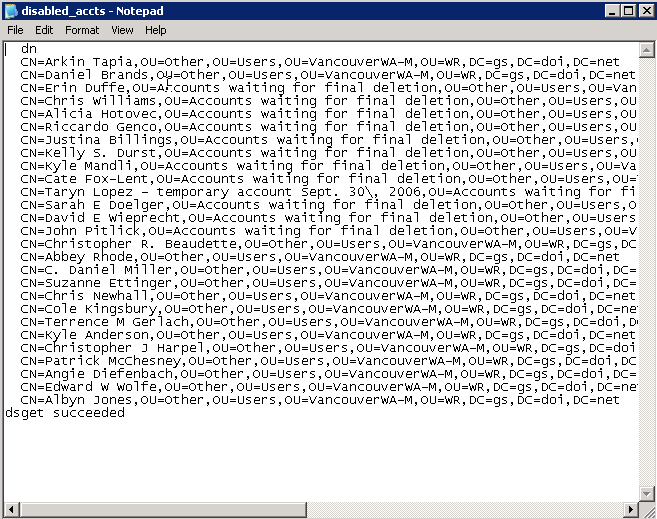
In this example, the dsquery command finds all user accounts in a specified OU. The result of the dsquery command is then piped to the dsget command to find which of these user accounts are disabled. Because of the amount of information returned by the dsquery command, a better strategy may be to redirect the output to a text file which can be printed or reviewed in a text editor. The following example shows this strategy, and the results in a text editor window.
Command – dsquery user “OU=Other,OU=Users,OU=VancouverWA-M,OU=WR,DC=gs,DC=doi,DC=net” | dsget user -dn -disabled > disabled_accts.txt
Command – notepad disabled_accts.txt
For More Information
Microsoft Dsquery Page
Microsoft Resource on Command Line Tools to Manage AD Obects
gpresult
The gpresult command line tool allows users and administrators to view Group Policy results, also known as the Resultant Set of Policy (RSoP), for a given computer, user, or both.
gpresultThe gpresult command line tool allows users and administrators to view Group Policy results, also known as the Resultant Set of Policy (RSoP), for a given computer, user, or both. This allows for easier group policy implementation and troubleshooting, as it provides details about policies set at multiple levels in a domain. This command line tool doesn’t require administrative access on a local computer. It allows specification of a user ID such that administrators can check the RSoP on remote computers.
Command syntax
Gpresult [/s Computer [/u Domain\User/p Password]][/user TargetUserName][/scope {user | computer}][{/v | /z}]
Recommendations and Examples
Note — Because the password will echo to the screen, and hence could be compromised, use of the “/p” flag is strongly discouraged.
Because the gpresult command polls the Common Information Management Object Model (CIMOM) database for the appropriate domain, it may take a few minutes for the results to be displayed.
The following example shows use of the gpresult command with no command line arguments. Because this report is so verbose, only a portion of the results are displayed.
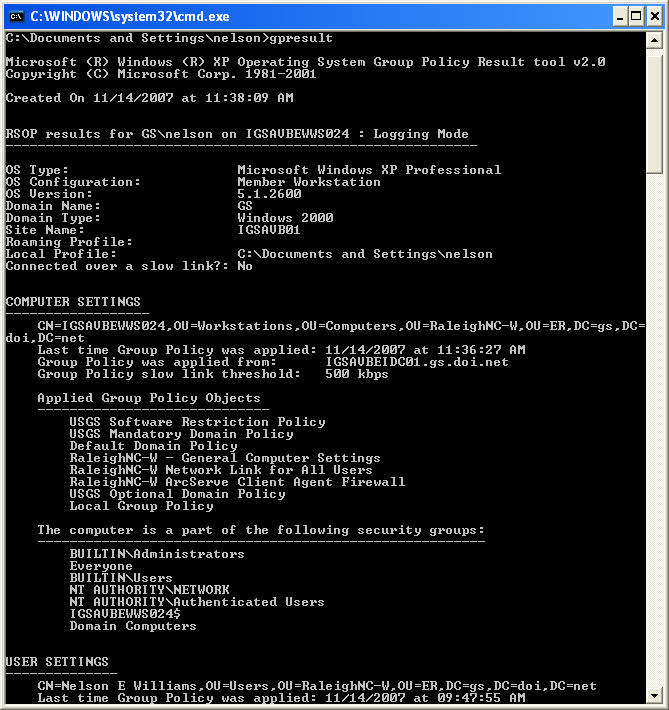
The above example shows results for the local computer for both computer and user policies.
The next example shows results on a remote computer for the user “rtraynor”, and for only user policies.
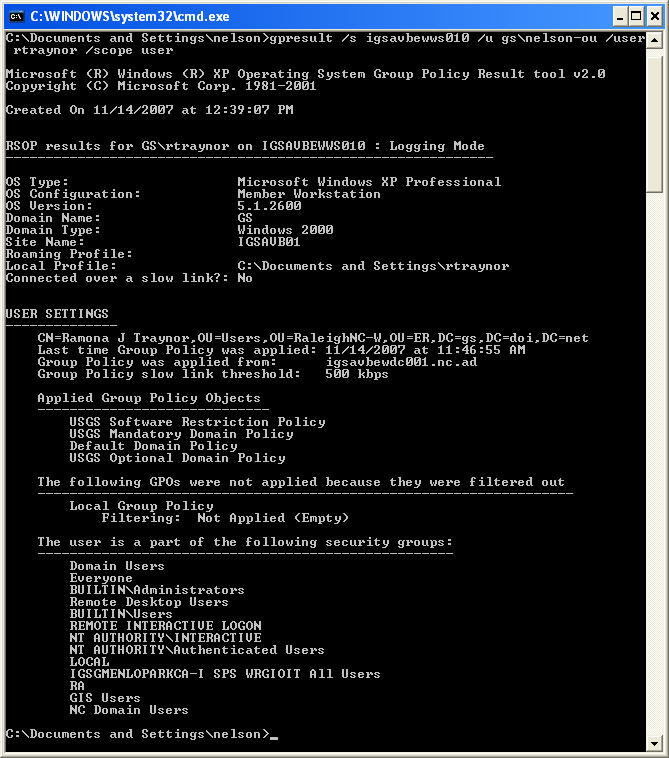
Because of the amount of information returned by the gpresult command, a better strategy may be to redirect the output to a text file which can be printed or reviewed in a text editor. The following example shows this strategy, and a portion of the results in a text editor window.
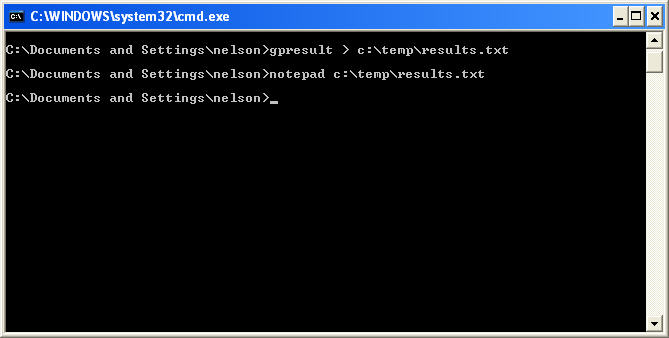
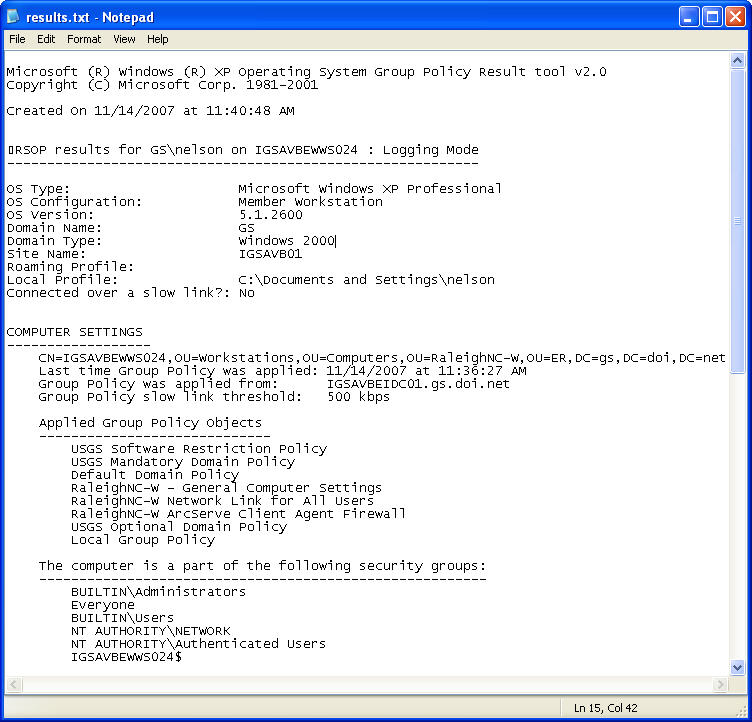
For More Information
Microsoft Gpresult Page
Microsoft RSoP Overview Page
getmac
The getmac command line tool allows users and administrators to retrieve the media access control (MAC), or ethernet address, and list of network protocols associated with each address for all network cards in a given computer, either locally or across a network.
getmacThe getmac command line tool allows users and administrators to retrieve the media access control (MAC), or ethernet address, and list of network protocols associated with each address for all network cards in a given computer, either locally or across a network.
Command syntax
getmac[.exe] [/s Computer [/u Domain\User [/p Password]]] [/fo {TABLE|LIST|CSV}] [/nh] [/v]
Recommendations and Examples
The following examples show applications of the getmac command line tool.
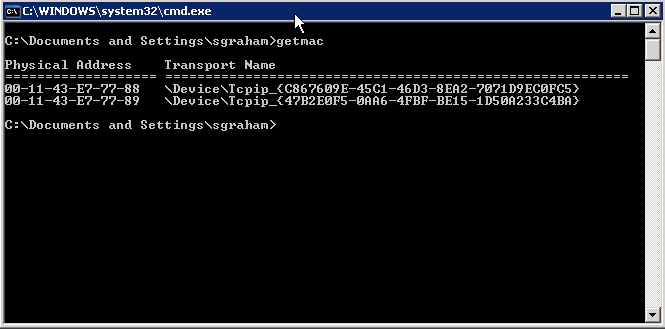
In this example, the getmac command is used with no other arguments. It returns the MAC address for each of the local network cards.
Command – getmac
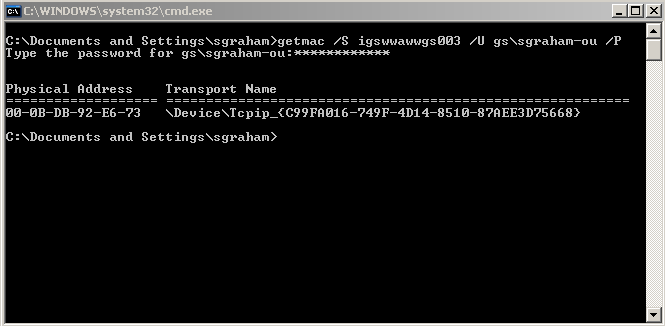
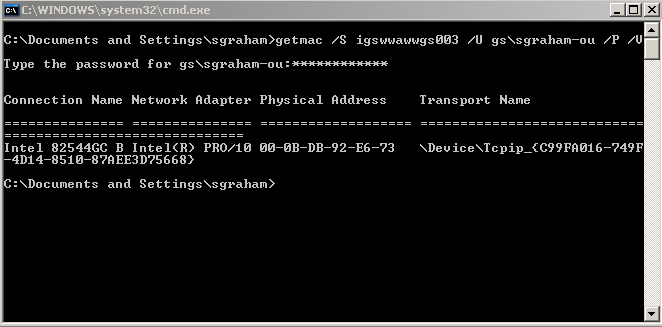
In this example, the getmac command is used with the /S argument to specify a remote system, and the username (/U) and password (/P) arguments to specify an account with access to the remote system. It returns the MAC address for each of the remote network cards. If you don’t specify a password after the /P, you will be prompted to enter it.
Command – getmac /S igswwawwgs003 /U gs\sgraham-ou /P
In this example, the getmac command is used with the /S argument to specify a remote system, the username (/U) and password (/P) arguments to specify an account with access to the remote system, and the /V argument to specify verbose output. It returns the MAC address for each of the remote network cards, as well as the type of network adapter. If you don’t specify a password after the /P, you will be prompted to enter it.
Command – getmac /S igswwawwgs003 /U gs\sgraham-ou /P /V
For More Information
Microsoft getmac Page
netstat
The netstat command line tool displays active TCP/UDP connections, ports on which the computer is listening, and ethernet statistics.
netstatThe netstat command displays active TCP connections, ports on which the computer is listening, Ethernet statistics, the IP routing table, IPv4 statistics (for the IP, ICMP, TCP, and UDP protocols), and IPv6 statistics (for the IPv6, ICMPv6, TCP over IPv6, and UDP over IPv6 protocols).
Command syntax
netstat[-a ] [-e ] [-n ] [-o ] [-p Protocol] [-r ] [-s ] [Interval]
Recommendations and Examples
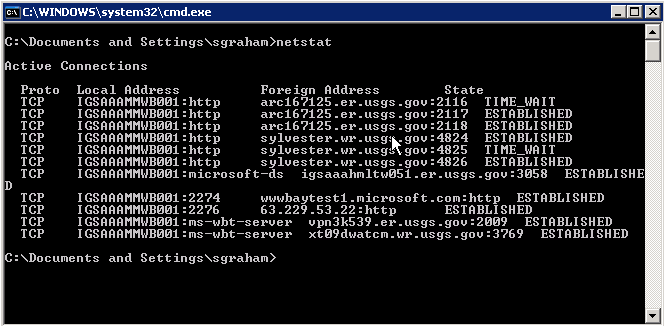
The following example shows use of the netstat command with no command line arguments. It displays active TCP connections.
Command – netstat
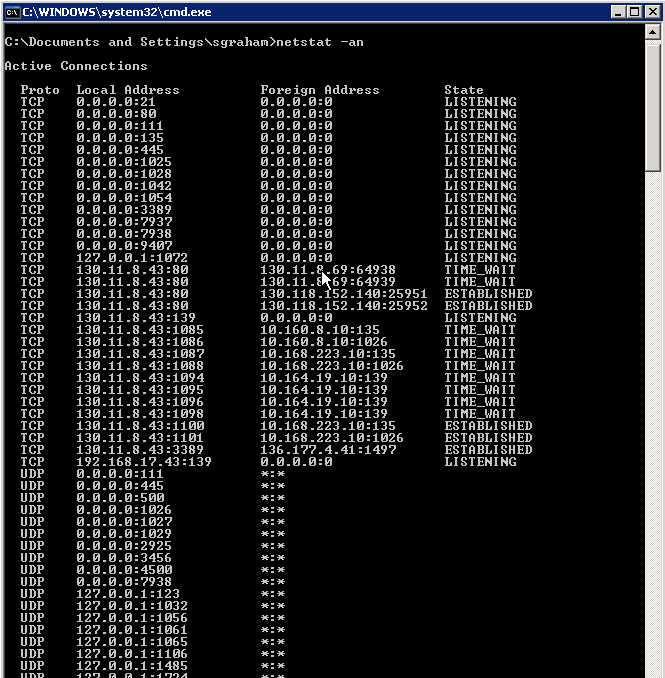
Netstat with the -a parameter specified, netstat displays all connections, and the TCP and UDP ports on which the computer is listening. The -n parameter displays active TCP connections, with addresses and port numbers expressed numerically.
Command – netstat -an
For More Information
Microsoft Netstat Page
Windows Server TechCenter Page on Netstat Usage
openfiles
The openfiles command line tool allows administrators to query, display, and disconnect files opened on network shares or local filesystems.
openfilesThe openfiles command line tool allows administrators to query, display, and disconnect files opened on network shares or local filesystems.
Command syntax
openfiles.exe /query [/s Computer [/u Domain\User [/p Password]]] [/fo {TABLE|LIST|CSV}] [/nh] [/v]
Parameters
/s Computer : Specifies the name or IP address of a remote computer. (Do not use backslashes.) The default is the local computer.
/u Domain \ User : Runs the command with the account permissions of the user specified by User or Domain\User. The default is the permissions of the current logged on user on the computer issuing the command.
/p Password : Specifies the password of the user account that is specified in the /u parameter.
/fo { TABLE | LIST | CSV } : Specifies the format to use for the query output. Valid values are TABLE, LIST, and CSV. The default value for output is TABLE.
/nh : Suppresses column header in the output. Valid only when the /fo parameter is set to TABLE or CSV.
/v : Specifies that verbose task information be displayed in the output.
/? : Displays help at the command prompt.
openfiles.exe /disconnect [/s Computer [/u Domain\User [/p Password]]] {[/id OpenFileID]|[/a UserName]|[/o OpenMode]} [/se SessionName] [/op OpenFileName]
Parameters
/s Computer : Specifies the name or IP address of a remote computer. (Do not use backslashes.) The default is the local computer.
/u Domain \ User : Runs the command with the account permissions of the user specified by User or Domain\User. The default is the permissions of the current logged on user on the computer issuing the command.
/p Password : Specifies the password of the user account that is specified in the /u parameter.
/id OpenFileID : Disconnects the file opened with the specified numeric OpenFileID on the computer specified by the /s parameter. Use openfiles.exe /query to learn the file ID. The wildcard (*) can be used to disconnect all open files on the specified computer.
/a UserName : Disconnects all open files that were accessed by the specified user on the computer specified by the /s parameter. The wildcard (*) can be used to disconnect all open files on the specified computer.
/o OpenMode : Disconnects all open files with the specified OpenMode on the computer specified by the /s parameter. The OpenMode parameter includes the Read/Write and Read modes. The wildcard (*) can be used to disconnect all open files on the specified computer.
/se SessionName : Disconnects all open files that were created by the specified session on the computer specified by the /s parameter. The wildcard (*) can be used to disconnect all open files on the specified computer.
/op OpenFileName : Disconnects the open file that was created with the specified OpenFileName on the computer specified by the /s parameter. The wildcard (*) can be used to disconnect all open files on the specified computer.
/? : Displays help at the command prompt.
Recommendations and Examples
The following example shows uses of the openfiles command.
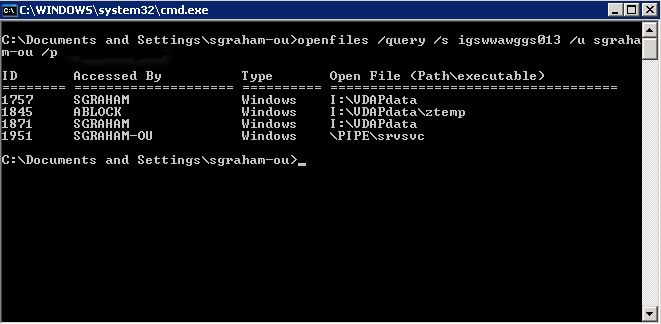
In this example, the openfiles command is used with the query option to list the openfiles on a server, and the output is the default output.
Command – openfiles /query /s igswwawggs013 /u username /p password
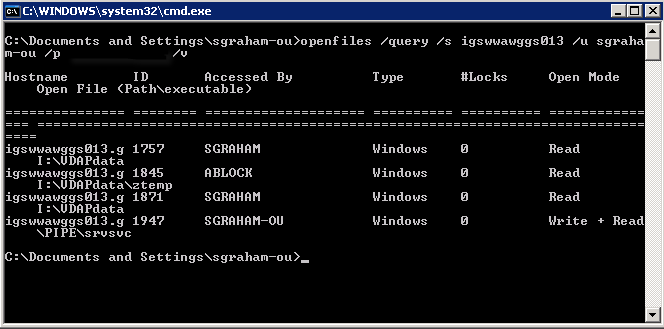
In this example, the openfiles command is used with the query option to list the openfiles on a server, and the output produced has more information, as the verbose option was used.
Command – openfiles /query /s igswwawggs013 /u username /p password /v
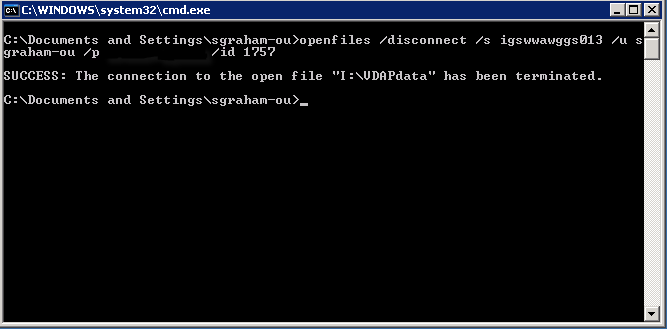
In this example, the openfiles command is used with the disconnect option to disconnect the user from the shared file. The file id was used to identify which file should be disconnected.
Command – openfiles /disconnect /s igswwawggs013 /u username /p password /id 1757
For More Information
Microsoft openfiles Page
ping
The ping command is a computer network tool used to test whether a particular host is reachable across an IP network. It works by sending ICMP echo request packets to the target host and listening for ICMP echo response replies.
pingThe ping command is used to verify IP-level connectivity by sending ICMP echo request messages and listening for ICMP echo response replies.
Command syntax
ping [-t] [-a] [-n Count] [-l Size] [-f] [-i TTL] [-v TOS] [-r Count] [-s Count] [{-j HostList | -k HostList}] [-w Timeout] [TargetName]
Recommendations and Examples
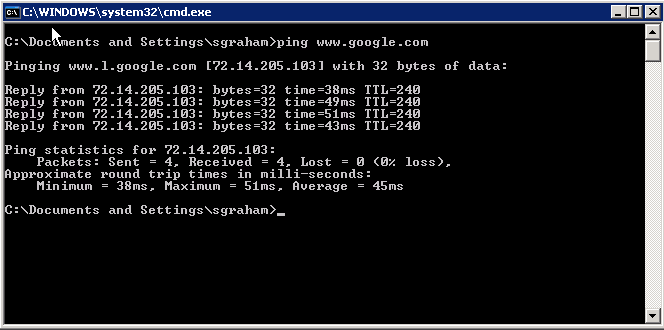
The following example shows use of the ping command with no command line arguments. It displays the hostname and IP address of the host you are pinging, and the roundtrip time for the message.
Command – ping www.google.com
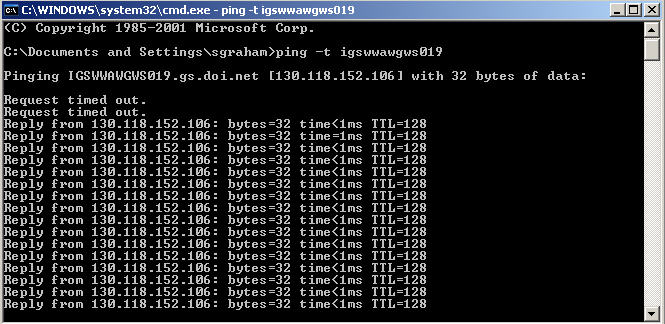
Ping with the –t option starts a continuous ping to the host. This is useful when restarting a remote server or desktop client. You will get a timeout as long as the host is down or rebooting. Once it is up and running again, the ping will start receiving packets, indicating to the administrator that it is available to connect to via remote desktop.
Command – ping -t igswwawgws019
For More Information
Microsoft Ping Page
Wininternals PSExec
Tool for executing commands on a remote computer
PSExecPSExec is one of a suite of command line tools available from Microsoft/SysInternals that allow you to do things on a remote computer. You may download the tools from:
http://technet.microsoft.com/en-us/sysinternals/bb896649.aspx
To install the tools unzip the file into your c:\windows\system32 directory or some other directory that is in your path statement.
To get started with PSExec open a command prompt with your privileged user account
To remotely run a program – like an installation script or other command – use the following command:
psexec \\computername -d -c -u gs\username-pr “program you want to run”
The key points to remember are that the program you want to run needs to be in a location that the remote computer can access – like a network share – and if the path to the program has a space in it you need to surround the entire path in double quotes. You can replace the computername with the name/patch of a text file that contains a list of computers to run the command on – in this way you can run the program on multiple computers at once – be sure to specify the entire path to the text file unless it is 1) in the same directory you are currently working out of or 2) in your path somewhere. If the command you want to execute on the remote system needs to access the network then you need to specify a user account with the -u switch, otherwise the command will execute under the local system account and not have access to the network.
Type psexec at the command prompt to see the listing of syntax or see below.
usage: psexec [\\computer[,computer2[,…] | @file][-u user [-p psswd]][-n s][-l][-s|-e][-x][-i [session]][-c [-f|-v]][-w directory][-d][-<priority>][-a n,n,… ] cmd [arguments]
computer
Direct PsExec to run the application on the computer or computers specified. If you omit the computer name PsExec runs the application on the local system and if you enter a computer name of “\\*” PsExec runs the applications on all computers in the current domain.
@file
Directs PsExec to run the command on each computer listed in the text file specified.
-a
Separate processors on which the application can run with commas where 1 is the lowest numbered CPU. For example, to run the application on CPU 2 and CPU 4, enter: “-a 2,4”
-c
Copy the specified program to the remote system for execution. If you omit this option then the application must be in the system’s path on the remote system.
-d
Don’t wait for application to terminate. Only use this option for non-interactive applications.
-e
Does not load the specified account’s profile.
-f
Copy the specified program to the remote system even if the file already exists on the remote system.
-i
Run the program so that it interacts with the desktop of the specified session on the remote system. If no session is specified the process runs in the console session.
-l
Run process as limited user (strips the Administrators group and allows only privileges assigned to the Users group). On Windows Vista the process runs with Low Integrity.
-n
Specifies timeout in seconds connecting to remote computers.
-p
Specifies optional password for user name. If you omit this you will be prompted to enter a hidden password.
-s
Run remote process in the System account .
-u
Specifies optional user name for login to remote computer.
-v
Copy the specified file only if it has a higher version number or is newer on than the one on the remote system.
-w
Set the working directory of the process (relative to the remote computer).
-x
Display the UI on the Winlogon desktop (local system only).
-priority
Specifies -low, -belownormal, -abovenormal, -high or -realtime to run the process at a different priority.
program
Name of the program to execute.
arguments
Arguments to pass (note that file paths must be absolute paths on the target system)
You can enclose applications that have spaces in their name with quotation marks e.g. “psexec \\marklap “c:\long name\app.exe”. Input is only passed to the remote system when you press the enter key, and typing Ctrl-C terminates the remote process.
If you omit a username the remote process runs in the same account from which you execute PsExec, but because the remote process is impersonating it will not have access to network resources on the remote system. When you specify a username the remote process executes in the account specified, and will have access to any network resources the account has access to. Note that the password is transmitted in clear text to the remote system.
You can use the current version of PsExec as a Runas replacement when you target the local system because PsExec does not require you to be an administrator.
Examples
The following command launches an interactive command prompt on \\marklap:
psexec \\marklap cmd
This command executes IpConfig on the remote system with the /all switch, and displays the resulting output locally:
psexec \\marklap ipconfig /all
This command copies the program test.exe to the remote system and executes it interactively:
psexec \\marklap -c test.exe
Specify the full path to a program that is already installed on a remote system if its not on the system’s path:
psexec \\marklap c:\bin\test.exe
Run Regedit interactively in the System account to view the contents of the SAM and SECURITY keys:
psexec -i -d -s c:\windows\regedit.exe
To run Internet Explorer as with limited-user privileges use this command:
psexec -l -d “c:\program files\internet explorer\iexplore.exe”