Note: This page is no longer updated. The new Mac OS page can be found at: https://tst.usgs.gov/operating-systems-2/mac-support/
Welcome to the Mac technical support page. Below you will find links to current build configurations, tips and tricks, and troubleshooting.
Required Software and Useful Links
macOS STIG
Create a macOS Install Disk
Create a Time Machine Backup
Firewall and Sharing
- BigFix Client – is deployed via GPO (BUTST – Centrify – IEM Mac Installer) which is linked at the Regional Level. Once a Macintosh system has been joined to the Domain, the BigFix application will automatically install. For more information about this click here.
- Pulse Secure – Check the Pulse site for the latest version of Pulse Secure to install on Macintosh systems.
- Data at Rest – Since April of 2009, the Department of the Interior (DOI) has been issuing guidance to implement adequate encryption on mobile devices which store sensitive information. The directive required all bureaus including USGS to implement DAR encryption by December 31, 2010. For more information about this click here.
- FireEye HX Endpoint Agent – Installation of FireEye client on Mac system is on hold due to DOI licensing issues.
Catalina

Jamf Enrollment
Only clean Installations of Catalina will enroll successfully
Mojave enrollments are not supported
Trying to upgrade or restore from Mojave or Time Machine will cause enrollment to fail
Document updated April 6, 2021
Big Sur
/cdn.vox-cdn.com/uploads/chorus_asset/file/20047135/big_sur.jpeg)
macOS Big Sur is here, with its redesigned user interface, new icons, new system sounds, and a refreshed general appearance.
Follow the instructions below for guidance on upgrading JAMF-enrolled Catalina systems and onboarding of new installations of the Big Sur operating system.
FAQ
*To find a FAQ quickly – use Control+F (Command+F on a Mac) to bring up a search box. Type a keyword or phrase in the search box to find text on the current page
1. SSH to Mac with TFA
You can SSH to a Mac with TFA enforced by using public/private key pairs. For example, say you physically access a source Mac and would like to remotely access a destination Mac over SSH. Start by creating a public-private key pair on the source machine. To do this, open a command-line terminal (/Applications/Utilities/Terminal) and type the following:
source% mkdir -p ~/.ssh source% chmod 700 ~/.ssh source% ssh-keygen -t rsa -b 4096
You will be prompted for where to save the key; accept the default location. You will also be prompted for a passphrase to encrypt the key. Leaving the passphrase empty is not recommended. Once the public key file is generated (typically: ~/.ssh/id_rsa.pub), you should copy it to the destination machine. It is safe to copy this file with whatever mechanism you have available (email, USB, etc…) as this file is “public”.
On the destination machine, you now must append the public key file you generated to the end of your “authorized_keys” file. Assuming you have saved the public key file (from the source machine) on the Desktop of the destination machine, you can accomplish this as follows:
destination% mkdir -p ~/.ssh
destination% cat ~/Desktop/id_rsa.pub >> ~/.ssh/authorized_keys
destination% chmod -R 700 ~/.ssh
Now that you have the public key installed on the destination machine, you should be able to SSH from the source machine to the destination machine by typing the “passphrase” you generated when creating the public/private key pair. Note that this passphrase has nothing to do with AD credentials or PIN number
2. How to sign into a Mac if a user forgets their card?
- Contact the Service Desk or local COUA.
- Access ADUC (Active Directory Users and Computers)
- Span down through gs.doi.net to DI > EAD > Group > TFA
- Right-click IGSU DI-TFA-ComputerExceptionTMP, and select properties
- Click the Members tab and add the user’s AD username. (Note: windows machines use computer names, Macs must use AD username)
- Reboot the machine.
- If DAR is enabled, you should see this screen below after the Apple logo.
- The first sign-in would be considered PBA. We recommend always using your PIN when DAR is the first setup. (You can do this by making sure it’s TFA enforced before encryption) Go ahead and enter the Pin without the card in. It isn’t uncommon to see just a username and password screen too. Most of the time it will show the enabled users if the user has it set in system preferences.
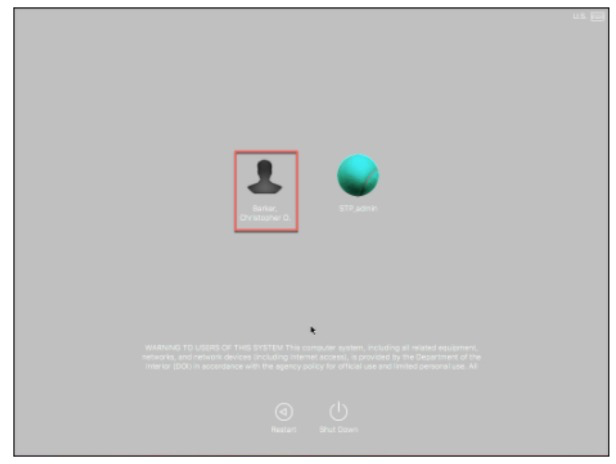
- Now you should see the banner and a sign-in screen. This will be your AD Username and Password.
- Once the user has his/her card, remove him/her from the IGSU DI-TFA-ComputerExceptionTMP group. Everything will go back to normal after a reboot.
3. Local Admin Password
When logging in to a local admin account you may have recently noticed you get prompted to change the password. We recognize this may be problematic and offer the following solution. Open a command-line terminal and …
- Clear the old policies $ sudo pwpolicy -clearaccountpolicies
- Set a new policy $ sudo defaults write \ /Library/Preferences/com.apple.loginwindow \ PasswordExpirationDays -int 0 $ sudo pwpolicy -setglobalpolicy “usingHistory=0 usingExpirationDate=0”
- Verify the new policy $ sudo pwpolicy -u admin -getpolicy Password: Getting policy for admin newPasswordRequired=0
4. Connect to Servers
To connect to servers and shared files using the Connect to Server feature in Finder, type Cmd + K while in a Finder window.
Example – smb://gs.doi.net/sharename
5. TFA Authentication: Changing your AD Password
6. After installing latest updates, laptop won’t complete boot, but requests continual restarts
Overview
Instructions for how to rescue a MacOS computer from a continual restart cycle. Symptoms could be a completely black screen or requests continual restarts, or the hard drive is locked after updates.
Steps
- Boot the computer into Recovery mode by pressing (cmd+r)
- Select Disk Utility and run first-aid
- In recovery mode, select the startup disk and unlock it.
- Requires elevated privileges
- Restart your machine
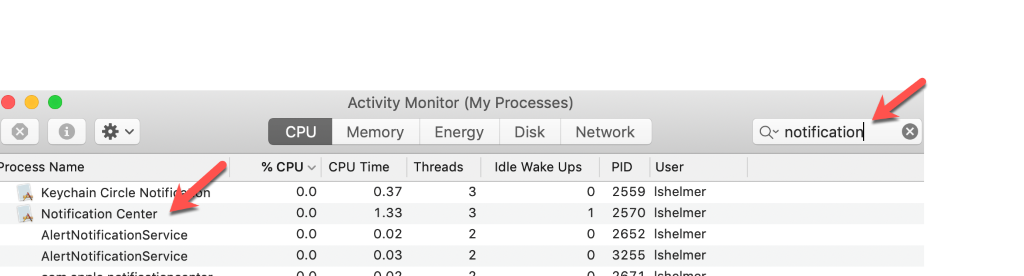
7. Mac notifications get stuck on ‘Show’ instead of ‘Close’
This can happen after a disk isn’t ejected properly or notifications that you have updates.
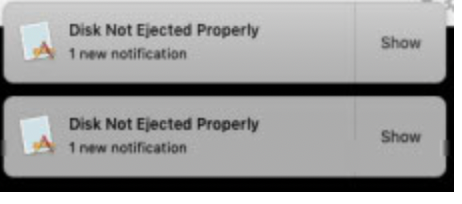
Open Activity Monitor – Applications>Utilities>Activity Monitor
Search for notification process and Quit or Force Quit
8. How to Remote Desktop Protocol (RDP) from a Mac to PC Computer
Overview
These are the instructions for how to RDP from a MacOS computer to a PC. Mac to Mac is not possible with this client. It is for all current MacOS supported by the USGS.
Steps
Make sure you are using the latest version of the MS Remote Desktop App
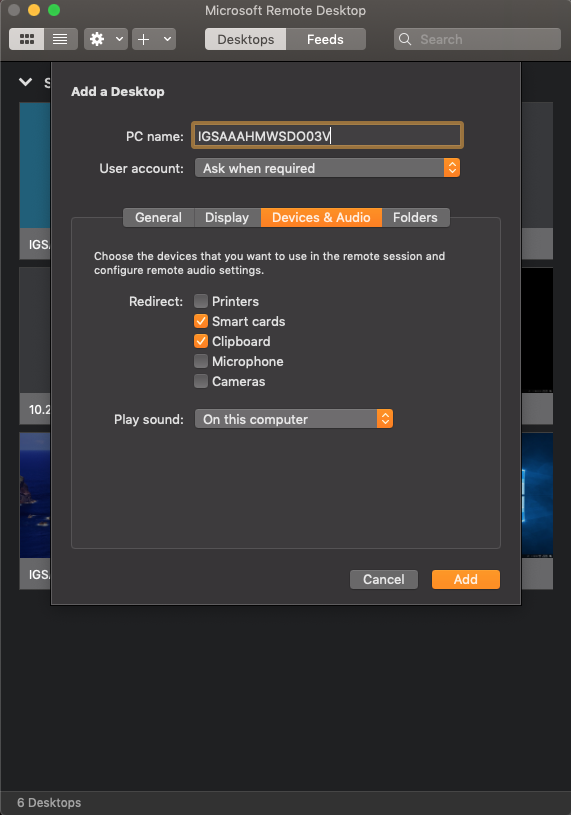
Click + at the top of the Microsoft Remote Desktop Window and select Desktop
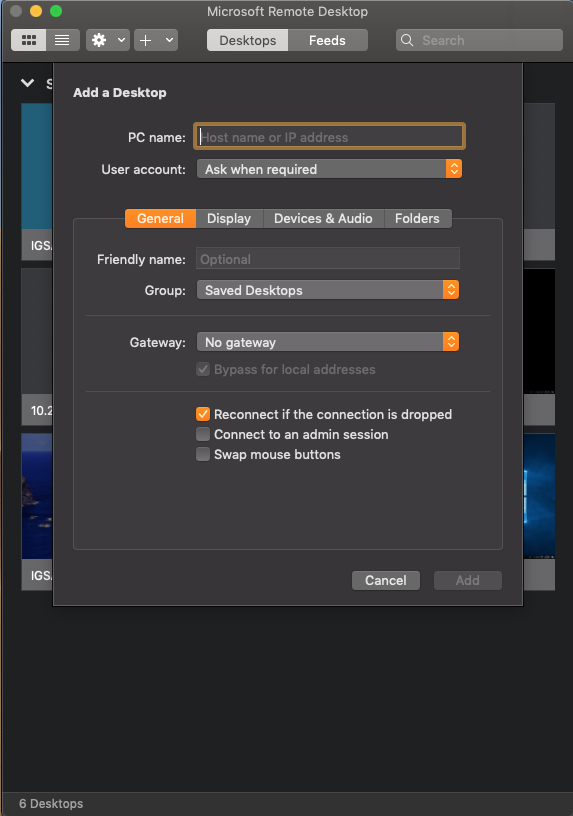
Add the PC name or IP Address, Then click the Devices & Audio Tab and Select Smart Cards under Redirect. Leave everything else as default.
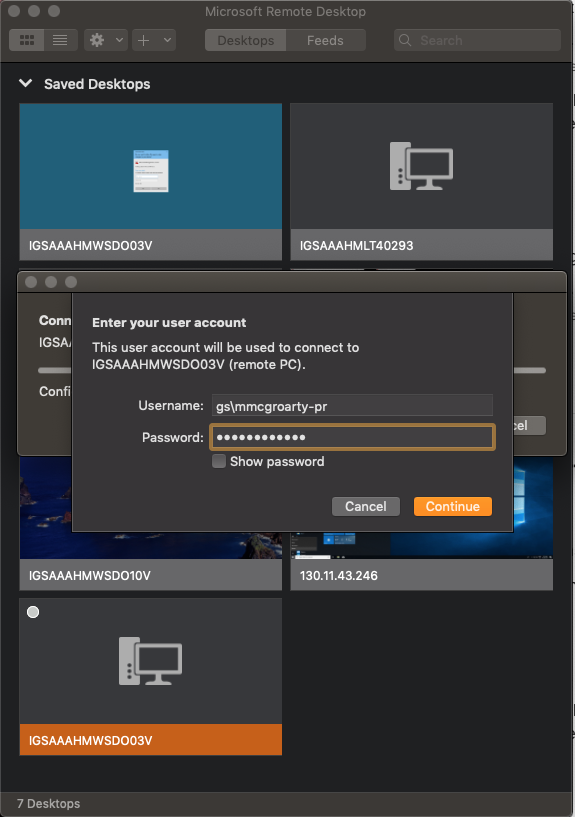
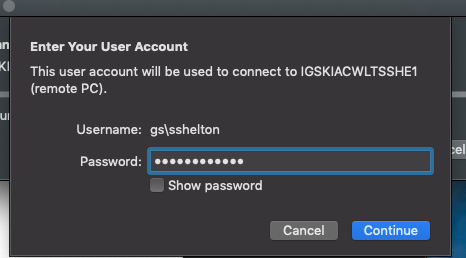
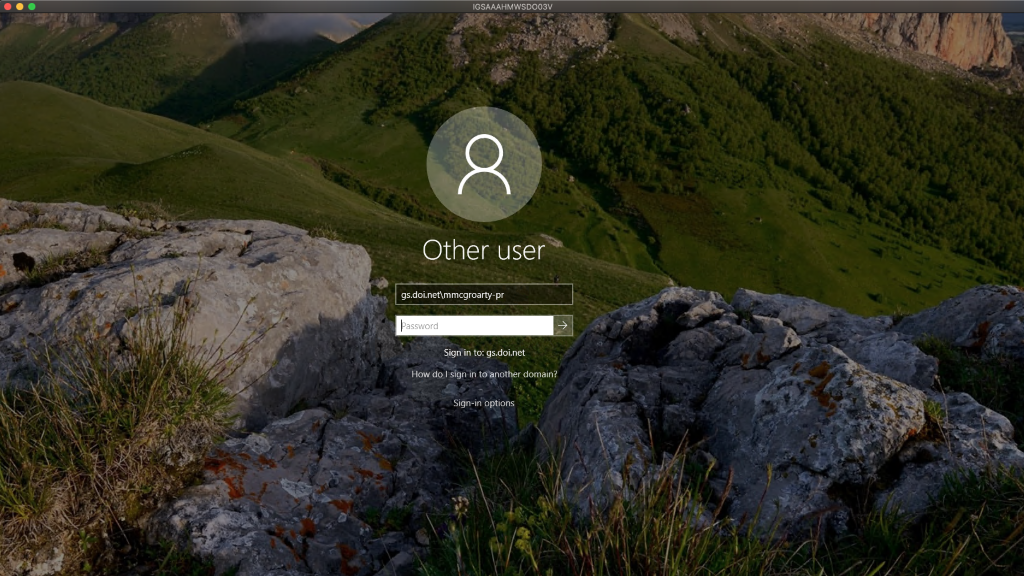
When prompted for a User Account, Type in your user account with gs\ (ex: gs\mmcgroarty-pr) Then enter your AD Password and click Connect.
(If user does not have a PR you must configure Remote access to the target machine by following the instructions here:
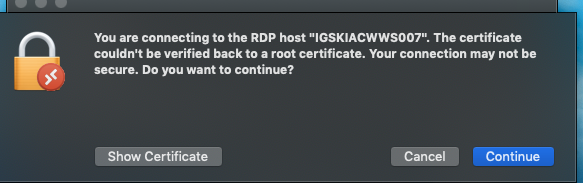
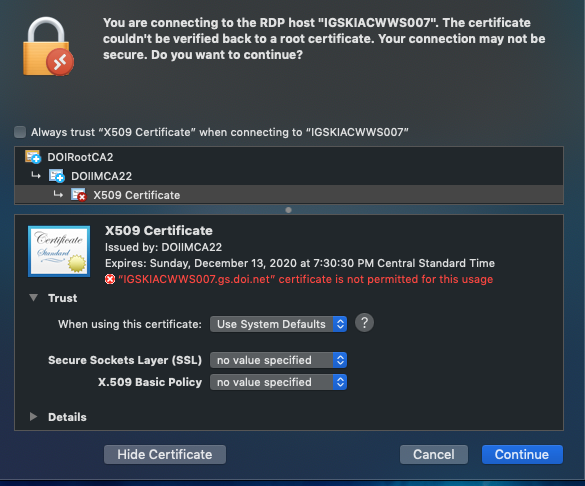
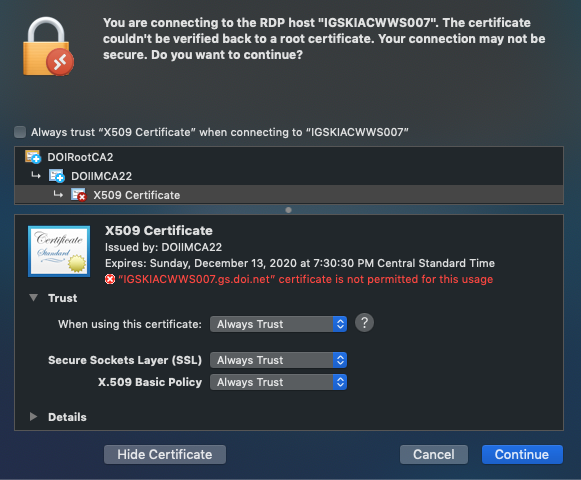
If you see this window, then you need to approve the certificate so it will pass through when trying to sign into a Windows computer. Select Show Certificate, expand the “Trust”, then in each drop down window, select “Always Trust”. When you see the Cert Prompt click Continue
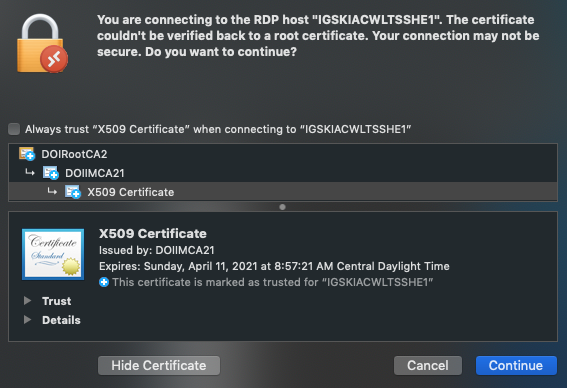
Once Certificate shows blue and Trusted, you should receive following prompt to enter AD credentials (AD username and AD Password).
Once connected to the machine you will be alerted that you must sign in with Smart Card, Click OK
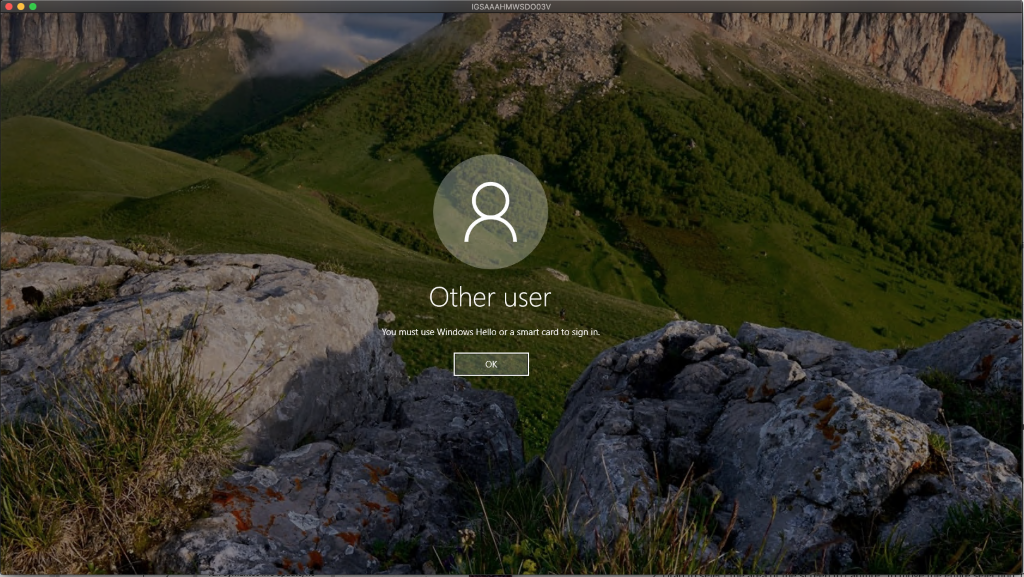
Click Sign in Options bottom and select Smart Card
Login with PIN
9. When signing into Adobe Creative Cloud App:
User appears to sign in but is immediately signed out
Overview
Instructions for fixing problems with the Adobe Creative Cloud sign-in process. Users are able to sign-in but the app immediately signs them out.
Steps
1. Close all the Creative Cloud Application processes from the Activity Monitor: Adobe CEF Help, Adobe Desktop Service, Adobe CRDaemon, Adobe IPC Brocker, CCXHelper, Core Sync, Core Synchelp
2. Drag and drop the Adobe Creative Cloud, Adobe Creative Cloud Experience and Adobe Application Manager to Trash
3. Drag and drop the Creative Cloud Desktop app from the Adobe Installer Folder in Utilities to trash
4. Drag and drop the Creative Cloud Desktop app from the Application to trash
5. Delete all the adobe folders and creative cloud folder from /library>>application support>>adobe
6. Delete all the adobe related folders and files and creative cloud folder and related files from /library>>application support>>Logs
7. Delete all the adobe related folders and files and creative cloud folder and related files from /library>>application support>>Preferences
**Delete the files OOBElib, pDap, NGL from both the locations ie, Logs and Preferences.
8. Delete all the adobe related folders and files and creative cloud folder and related files from ~/library>>application support>>Logs
9. Delete all the adobe related folders and files and creative cloud folder and related files from ~/library>>application support>>Preferences
**Delete the files OOBElib, pDap, NGL from both the locations ie, Logs and Preferences.
10. . Run the Creative Cloud Cleaner Tool (https://helpx.adobe.com/in/creative-cloud/kb/cc-cleaner-tool-installation-problems.html )
11 . Empty recycle bin
12. Restart the system.
13. Install creative cloud (https://helpx.adobe.com/in/download-install/kb/creative-cloud-desktop-app-download.html )
Please scroll down and choose from the alternate option from the download link to download your creative cloud.
14. Sign in back to the creative cloud Application.
If these steps do not work first time repeat steps 1 more time or contact adobe technical support for assistance. Go to adobe.com/support and select the chat icon lower right and choose get started under Account or Product Support.
10. How to make bootable installers for Mojave (10.14) & Catalina (10.15)
Overview
Instructions for how to make bootable installers for Mojave (macOS 10.14) and Catalina (macOS 10.15)
Steps
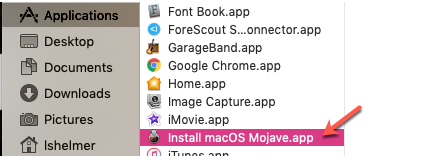
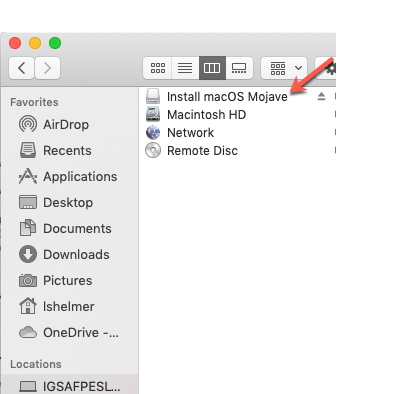
Download the macOS of interest. Links: macOS Catalina, or macOS Mojave.
Installers for each of these macOS versions download directly to your Applications folder as an app named Install macOS Catalina, or Install macOS Mojave. If the installer opens after downloading, quit it without continuing installation.
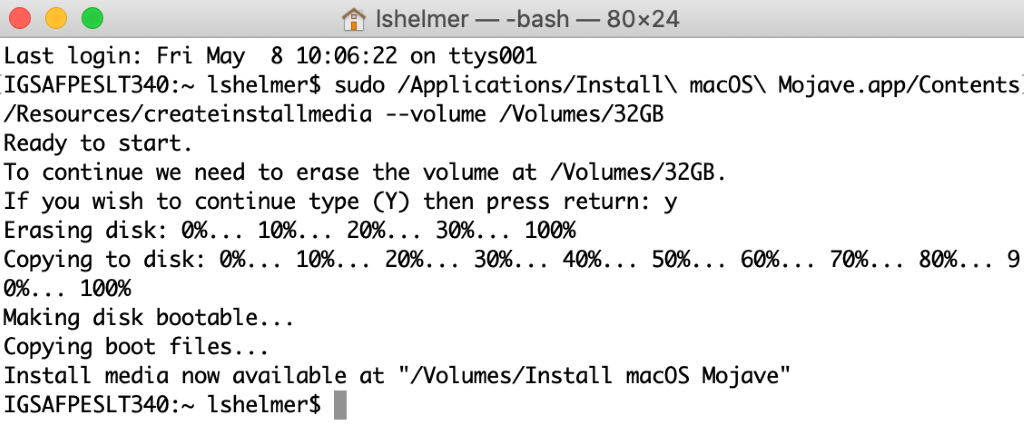
- Connect the USB flash drive or other volume that you’re using for the bootable installer. Make sure that it has at least 12GB of available storage and is formatted as Mac OS Extended.
- Open Terminal, which is in the Utilities folder of your Applications folder.
- Type or paste one of the following commands in Terminal. These assume that the installer is still in your Applications folder, and MyVolume is the name of the USB flash drive or other volume you’re using. If it has a different name, replace MyVolume in these commands with the name of your volume.
Catalina:*
sudo /Applications/Install\ macOS\ Catalina.app/Contents/Resources/createinstallmedia –volume /Volumes/MyVolume
Mojave:*
sudo /Applications/Install\ macOS\ Mojave.app/Contents/Resources/createinstallmedia –volume /Volumes/MyVolume
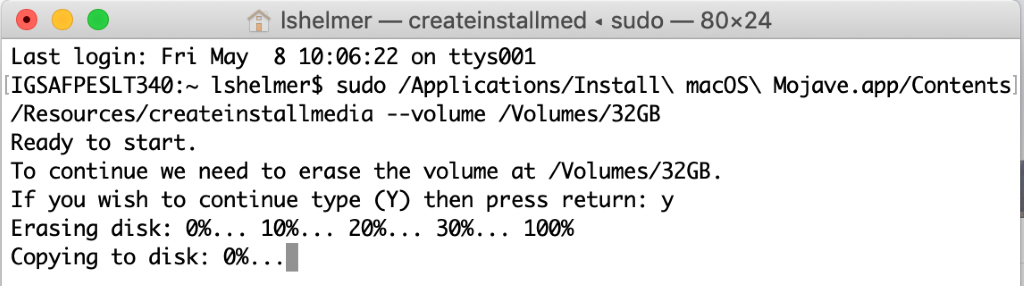

- Press Return after typing the command.
- When prompted, type your administrator password and press Return again. Terminal doesn’t show any characters as you type your password.
- When prompted, type Y to confirm that you want to erase the volume, then press Return. Terminal shows the progress as the bootable installer is created. The process could take several minutes.
- When Terminal says that it’s done, the volume will have the same name as the installer you downloaded, such as Install macOS Catalina. You can now quit Terminal and eject the volume.
For more information about the createinstallmedia command and the arguments that you can use with it, make sure that the macOS installer is in your Applications folder, then enter this path in Terminal:
Catalina:
/Applications/Install\ macOS\ Catalina.app/Contents/Resources/createinstallmedia
Mojave:
/Applications/Install\ macOS\ Mojave.app/Contents/Resources/createinstallmedia
11. Patching VM’s: Best Practices
Overview
How local COUA’s and users can keep their Windows VM’s up to date each month when patches are released. A best practices document.
As a local COUA, it’s ultimately your responsibility that the VM’s in your center are being patched. Responsibility also lies with the user to make sure they power up the VM at least once a month in order to receive patches and have the VM touch the network or over VPN, if teleworking.
Steps
Send out an email to your center for both Windows and Mac updates. A Sample Email for both Windows and Macintosh is provided at the end of this document.
You may have to reach out to individual users if they repeatedly don’t power up the VM and it is constantly showing up on compliance reports or falls out of AD. In those cases, it may be prudent to question the need of the VM.
Reminder: The VM has to have its network setting as ‘Bridged’ or ‘Auto Detect’ so that it shows as a separate system on the local network. Otherwise, it won’t receive patches. It just needs to be powered on, not necessarily logged in.
[SAMPLE EMAIL FOR NOTIFYING USERS]
[WINDOWS]
Windows Users (PC/Laptop/VM) –
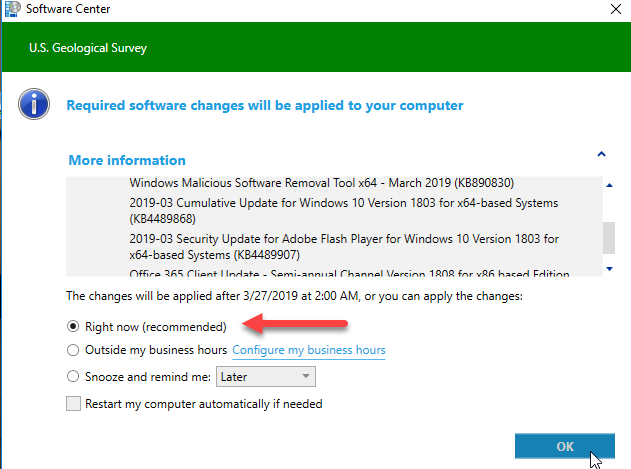
Beginning tomorrow morning, you should start to see a Software changes notice in your system tray as follows:

Changes were made to the MECM server to allow patching off of doi.net so a VPN connection is no longer required to patch your systems.
Right-click the icon to view the Required Updates. This month’s patches include BisonConnect, Chromium Edge, iTunes, and Windows OS and Office updates.
Select Right now (recommended) and click OK.
You may also see an offer from IBM Bigfix for some of the third party patches including Adobe Reader and Acrobat, Firefox, and Notepad++ in your task tray as follows:

Double-click the BigFix icon and accept the offers. They will run silently in the background.
A reboot will be required after the patches complete, so please remember to reboot your computer before Wednesday, April 29th at 2am or your computer will automatically reboot.
Those with modeling systems, please remember to reboot your computer when convenient. If you have not rebooted since last month’s patches, please do so immediately. Failure to reboot your systems will keep them from receiving critical updates.

Your computer is not compliant until a reboot has taken place.
If you rather let the patches run on their own, please remember that the computer will reboot on you with very little warning after it finishes applying the patches on 4/29/2020.
If you have any questions or issues, please let us know.
Thanks.
Keep this email in a folder so you can use it each month and just change the dates.
[SAMPLE EMAIL FOR NOTIFYING USERS]
[MACINTOSH]
Attention Macintosh Users (both Desktops and Laptops)
Monthly security updates for macOS are about to be released. These will become available on Wednesday, June 17 with an installation deadline of 2am on Wednesday, June 24, 2020.
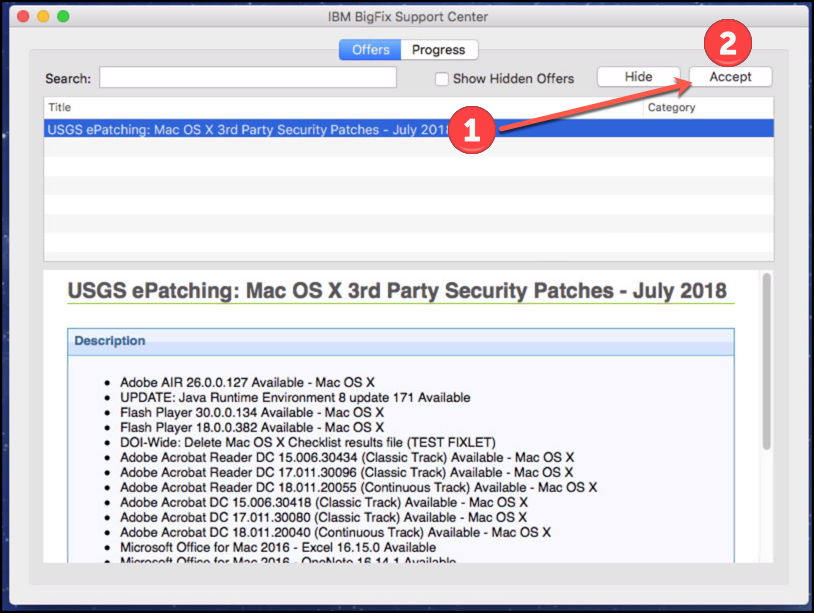
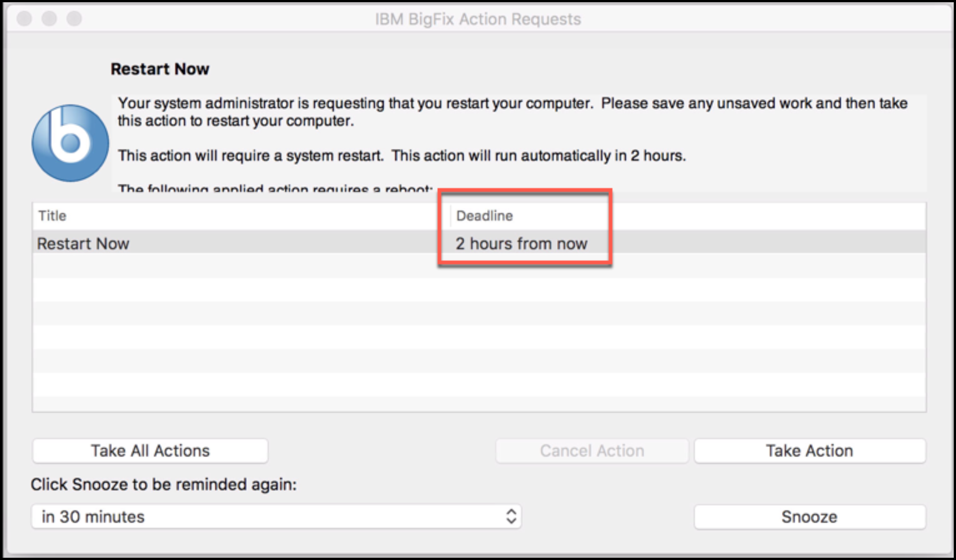
Beginning tomorrow morning, Mac users will start to see a BigFix offer pop-up similar to the following message:
1. Click the Dismiss button, then navigate to your system’s status menu and click the blue b icon.

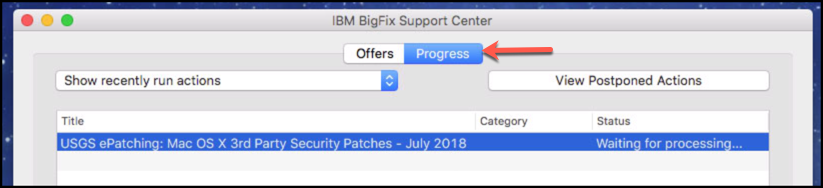
2. Highlight the newest offer and click the Accept button. Review status by clicking on the Progress tab.
3. Once you have accepted the offer from BigFix, and the actions have completed, you will be prompted with an “Action Requests” from BigFix. You will have a 2 HOUR deadline to restart your system.
CAUTION!!! A restart will commence once the deadline has been reached.
If you have any questions or issues, please let us know.
Thanks.
12. Steps to troubleshoot Pulse Secure Problems
Overview
If you are having problems with Pulse Secure, the following steps may help.
Steps
1. If there is a VM on the system, check that the smart is card is connected to the Mac and not the VM.
2. Make sure unecrypted external devices are not connected.
3. Make sure Symantec is up-to-date by running Live Update
4. Try rebooting first. Afterwards, try connecting again. Go through all the connections.
5. Exit the Pulse service and try opening from the Applications folder.
If the connections still won’t connect:
6. Boot into Recovery Mode (Cmd+R) and open Disk Utility. From the menu bar, click on View and Show all devices. Run first-aid. Restart, then try connecting again.
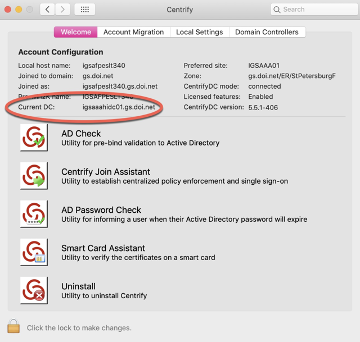
7. Open Centrify and make sure there is a DC (Domain Controller) listed.
8. Last resort, remove the home network and Wi-Fi adapter.
Steps (Alternative)
If the steps above fail, try the following (These will require admin access):
1. Uninstall Pulse
2. Open Network Preferences and ‘forget’ the users home network by Clicking on the Wi-Fi adapter and going to ‘Advanced’
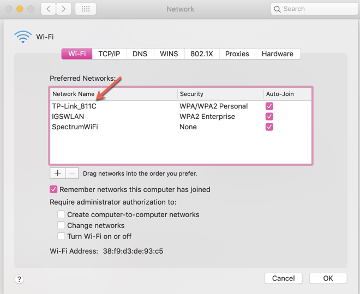
3. Click on the home network and use the ‘-’ at the bottom to remove.
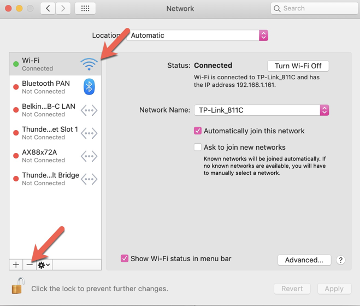
4. Remove the Wi-Fi adapter by clicking on Wi-Fi on the left sidebar and use the ‘-’
5. Reboot
6. Add the Wi-Fi adapter back by clicking the ‘+’ at the bottom and in the drop-down choose Wi-Fi
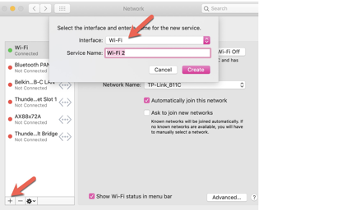
In this example (above), the Wi-Fi hasn’t been removed, but in your case, it won’t be there.
7. Reboot. This will add back the Wi-Fi
8. Have the user add the home network
9. Reinstall Pulse and add connections
10. Try connecting to Pulse
Last updated December 13, 2021
Office of the Associate Chief Information Officer (ACIO)
Bureau Unix Technical Support Team (BUTST)
_____________________
If you have any questions about these instructions, please contact the USGS Service Desk.
Chat: http://itsupport.usgs.gov
Web: http://support.usgs.gov
email: servicedesk@usgs.gov
Phone: 703-648-4357
Website: http://servicedesk.usgs.gov