Warning: Undefined variable $comment_tag in /afs/usgs.gov/www/tst/htdocs/wp-content/plugins/last-updated-shortcode/last-updated-shortcode.php on line 59
Last updated: November 17, 2023 at 6:47 am PST
All computer objects in Active Directory are required to have a user set in the managedBy attribute. This information will be used to tie computers to OrgCodes to assist with future cost recovery needs.
- The assigned customer should be set to the “end user” who uses the system day-to-day
- Contractors should be assigned directly to the “managedBy” attribute of their primary computer, in order to support user-based software deployment.
- Please Note: The previous guidance to use the contractors COR (contracting officer) or federal task lead no longer applies.
- Lab computers, servers, IT equipment, loaners, shared use computers, etc should be set to the “AD Joiner” service account. Information on how configure and use an AD Joiner account is here.
An “AD Data Validation” script runs weekly to notify COUAs about computer objects where the ManagedBy field is blank or set to an invalid AD username (for example, a user who has left USGS). Starting 10/4/2022, the “AD Data Validation” script will clear the ManagedBy field when it contains a Group instead of a User.
Note: The name of the attribute, “managedBy”, can be a little misleading in regards to how it will be used in USGS going forward. Please populate the property for assigned computers using the primary user, not the name of the IT person who manages the computer.
Modify managedBy for One Computer
- Open Active Directory Administrative Console (ADAC, run DSAC.exe) or Active Directory Users and Computers (ADUC, run DSA.msc).
- Search or navigate to the computer you’d like to check and/or change the managedBy attribute on, and go to its Properties.
- Locate the Managed By area (second section in ADAC, ‘Managed By’ tab in ADUC). Click the Edit/Change button, then search for and select the username of the user you’d like to associate with this computer. Click OK.
View managedBy for Multiple Computers
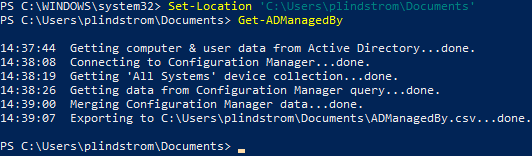
The USGS SysAdmin Tools (USAT) PowerShell module has a Get-ADManagedBy cmdlet for listing computer objects in your OU and their current managedBy user (to install USAT or learn more, see the Scripting and Automation page). Once you have USAT, you can run PowerShell as admin, navigate to the folder you’d like to store the file in using Set-Location (alias ‘cd’ works just like in command prompt), and then enter this command:
Get-ADManagedBy
Example:
It will create the CSV file you specify with the following fields (source in parentheses):
- Name (Active Directory)
- Description (Active Directory)
- SerialNumber (Configuration Manager)
- PrimaryUser (Configuration Manager)
- LastLogonUserName (Configuration Manager)
- CognizantEmployee (blank if FBMSAssetsCSV not supplied)
- CurrentManagedBy (Active Directory)
- NewManagedBy (blank)
If you want to bring in the Cognizant Employee from FBMS, here are the steps:
- Have an ROPC (property person) export a General Assets Query CSV and send it to you (include the following instructions)
- Open FBMS and the BI Launch Pad
- Go to the General Asset Query tab
- Select the most recent Period
- Filter for relevant CPO(s), if necessary
- Run the query
- Go to Export – CSV, being sure to check the Repeat Outer Header Members box
- Run (it will list a CognizantEmployee for each record it can match by Serial Number):
Get-ADManagedBy -FBMSAssetsCSV '<path to the CSV from the ROPC>'
If you get a red ERROR while getting the ‘All Systems’ device collection, it will continue, just leaving the fields from Configuration Manager (and FBMS) blank. If you think those fields would be helpful to you, you can try:
- Running the tool on a different computer that has the Configuration Manager console installed (installing USAT if necessary), or
- Uninstalling, rebooting, and re-installing the Configuration Manager console (see the Install the MECM Console page).
Modify managedBy for Multiple Computers
The USGS SysAdmin Tools (USAT) PowerShell module has a Set-ADManagedBy cmdlet that can use the CSV exported by Get-ADManagedBy to batch-edit the managedBy attribute in Active Directory (to install USAT or learn more, see the Scripting and Automation page). Once you have USAT, you can follow the instructions in the section above to create a CSV using Get-ADManagedBy.
Enter new or updated managedBy usernames in the NewManagedBy field, referring to the other fields and the guidance above in deciding which user to list.
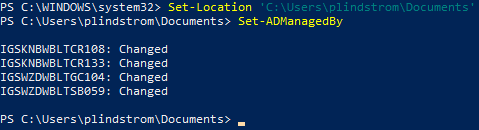
When you’re done editing, save the CSV and close it. Run PowerShell as admin (using an account with privileges to edit in Active Directory), navigate to the folder that has your CSV using Set-Location (alias ‘cd’ works just like in command prompt), and then enter this command:
Set-ADManagedBy
For each computer with edited managedBy information, it will search Active Directory for the user and assign its Distinguished Name to that computer’s managedBy field. Example: